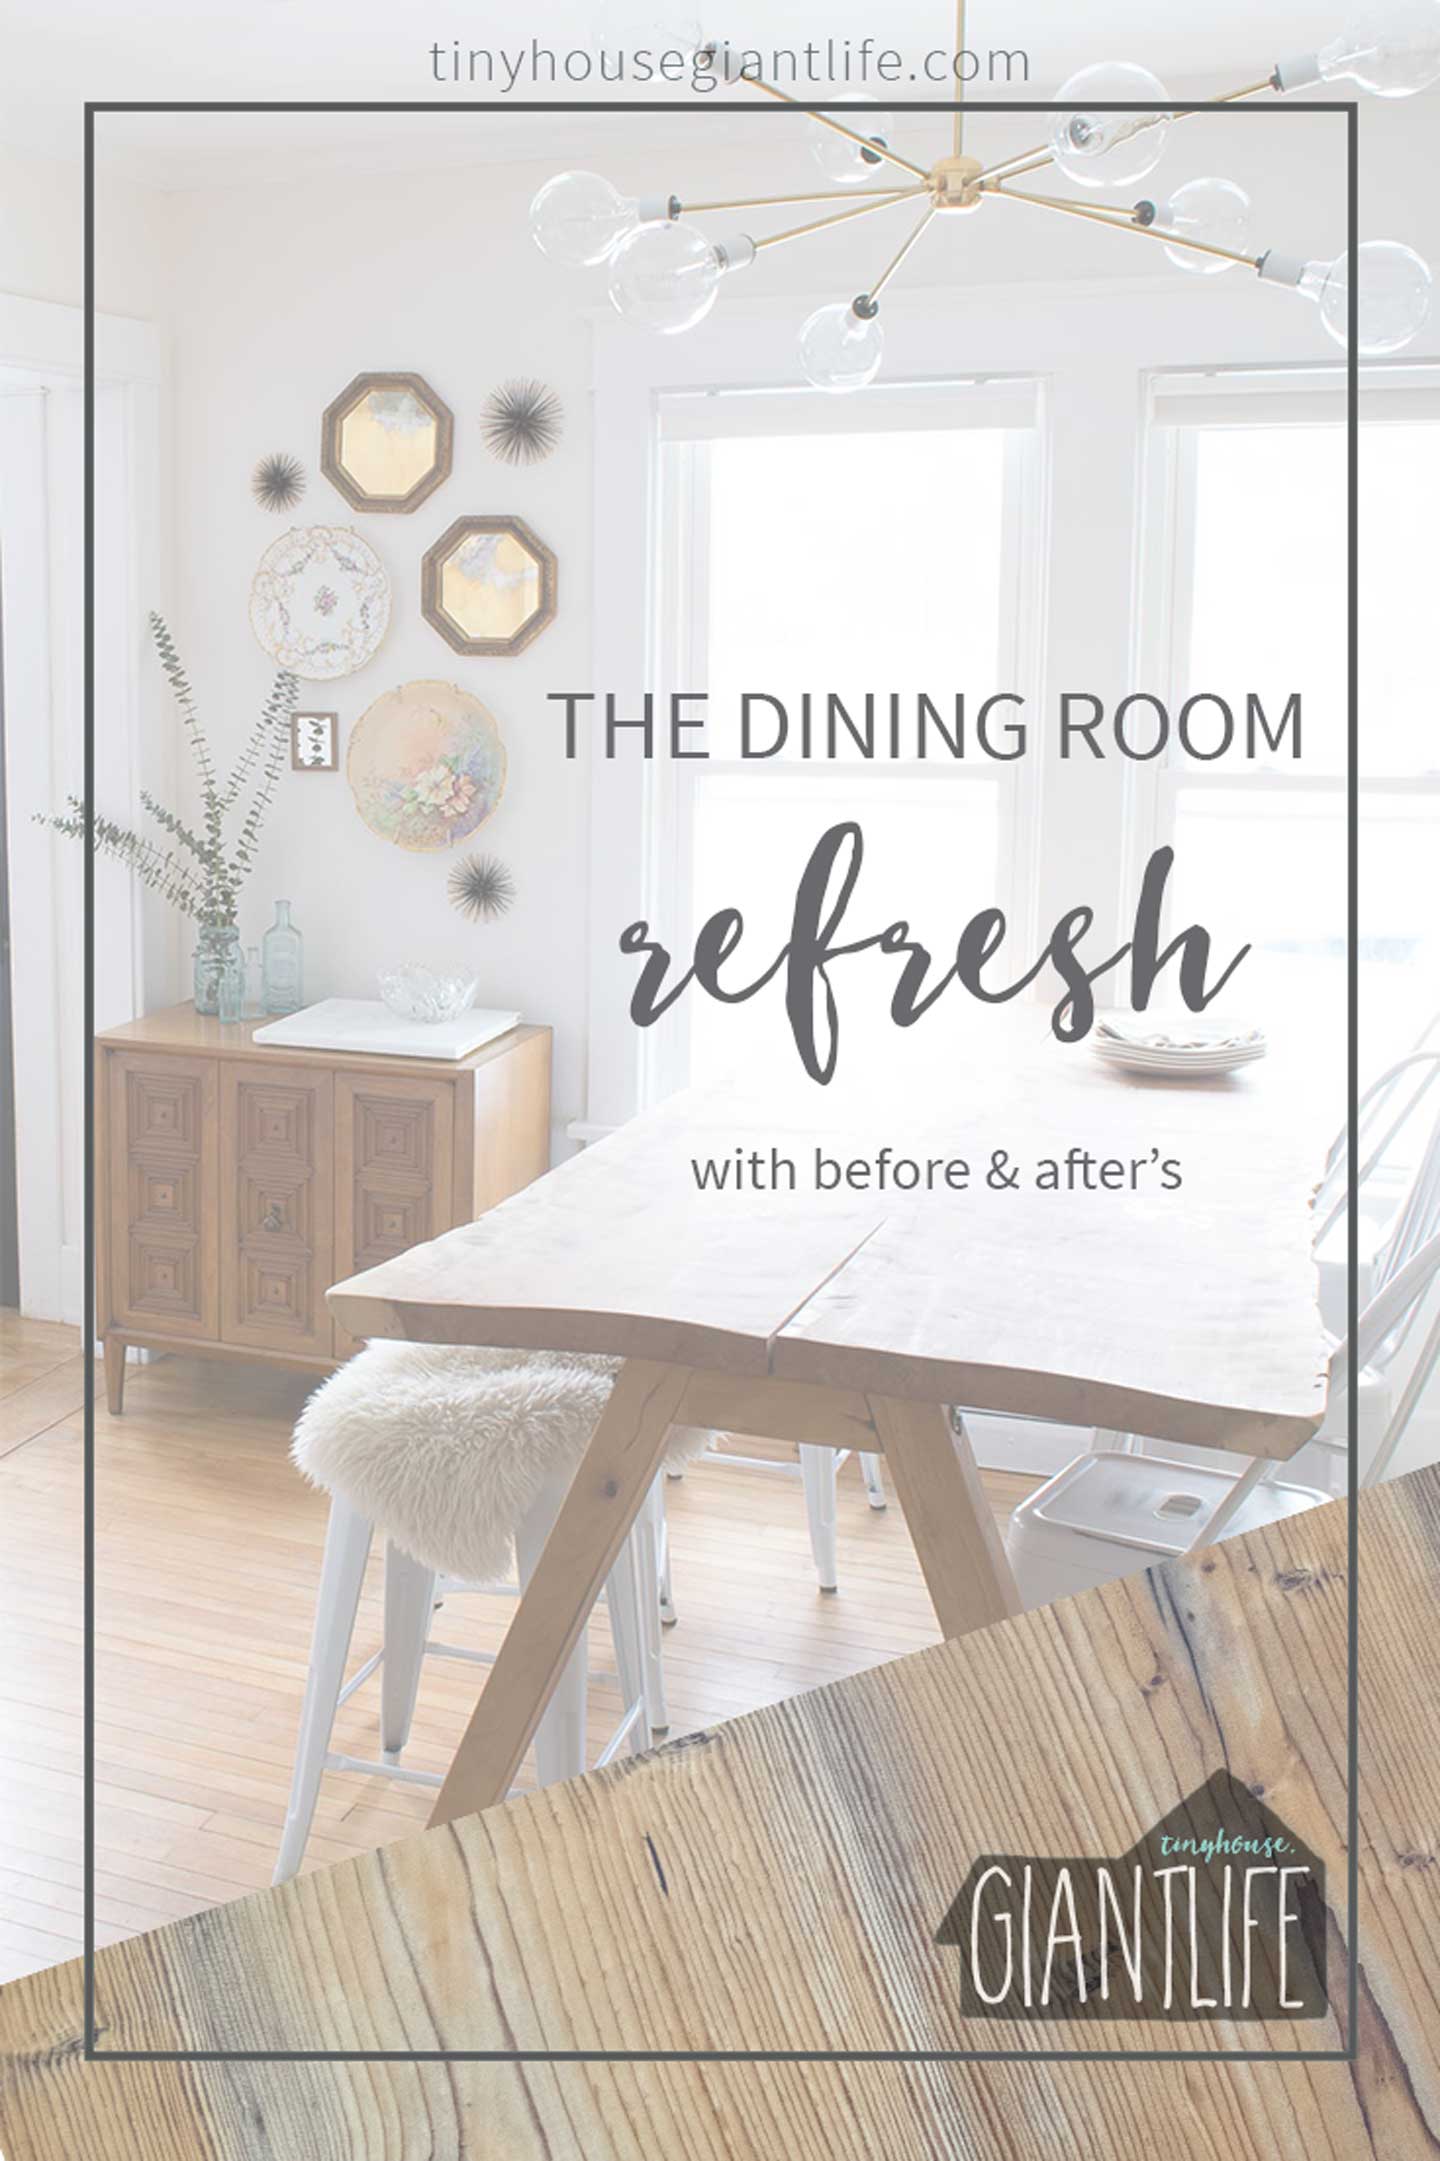
Designing Our Ideal Dining Room: The Full Refresh

DESIGNING OUR IDEAL DINING ROOM: THE FULL REFRESHThis dining room refresh has been in the making for a few years (to say the least). 
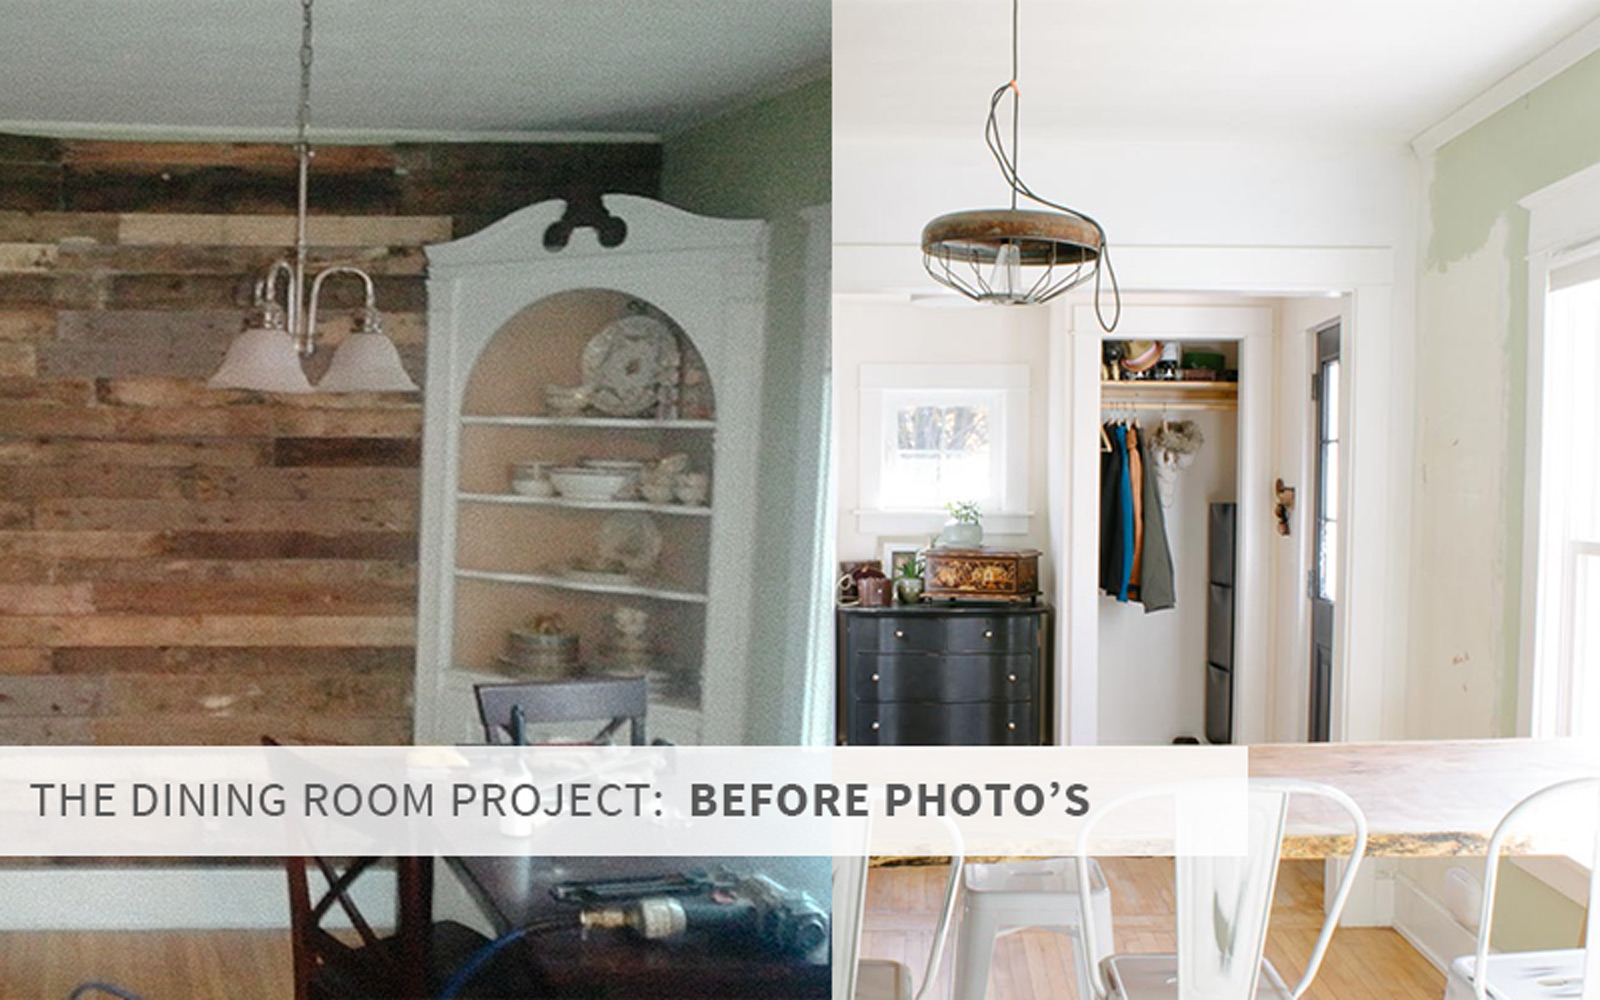
If you read our post with the dining room before photos,  you're aware we had a phase even before this dining room refresh.

The house has been in constant renovation status  for the last 6 years and we have been working hard in 2016 to #finishthatspace.

That being said, nothing ever seems fully complete, but projects we have been wishing and dreaming about, or desperately needed to complete, have been.

Designing Our Ideal Dining Room : The Full Refresh

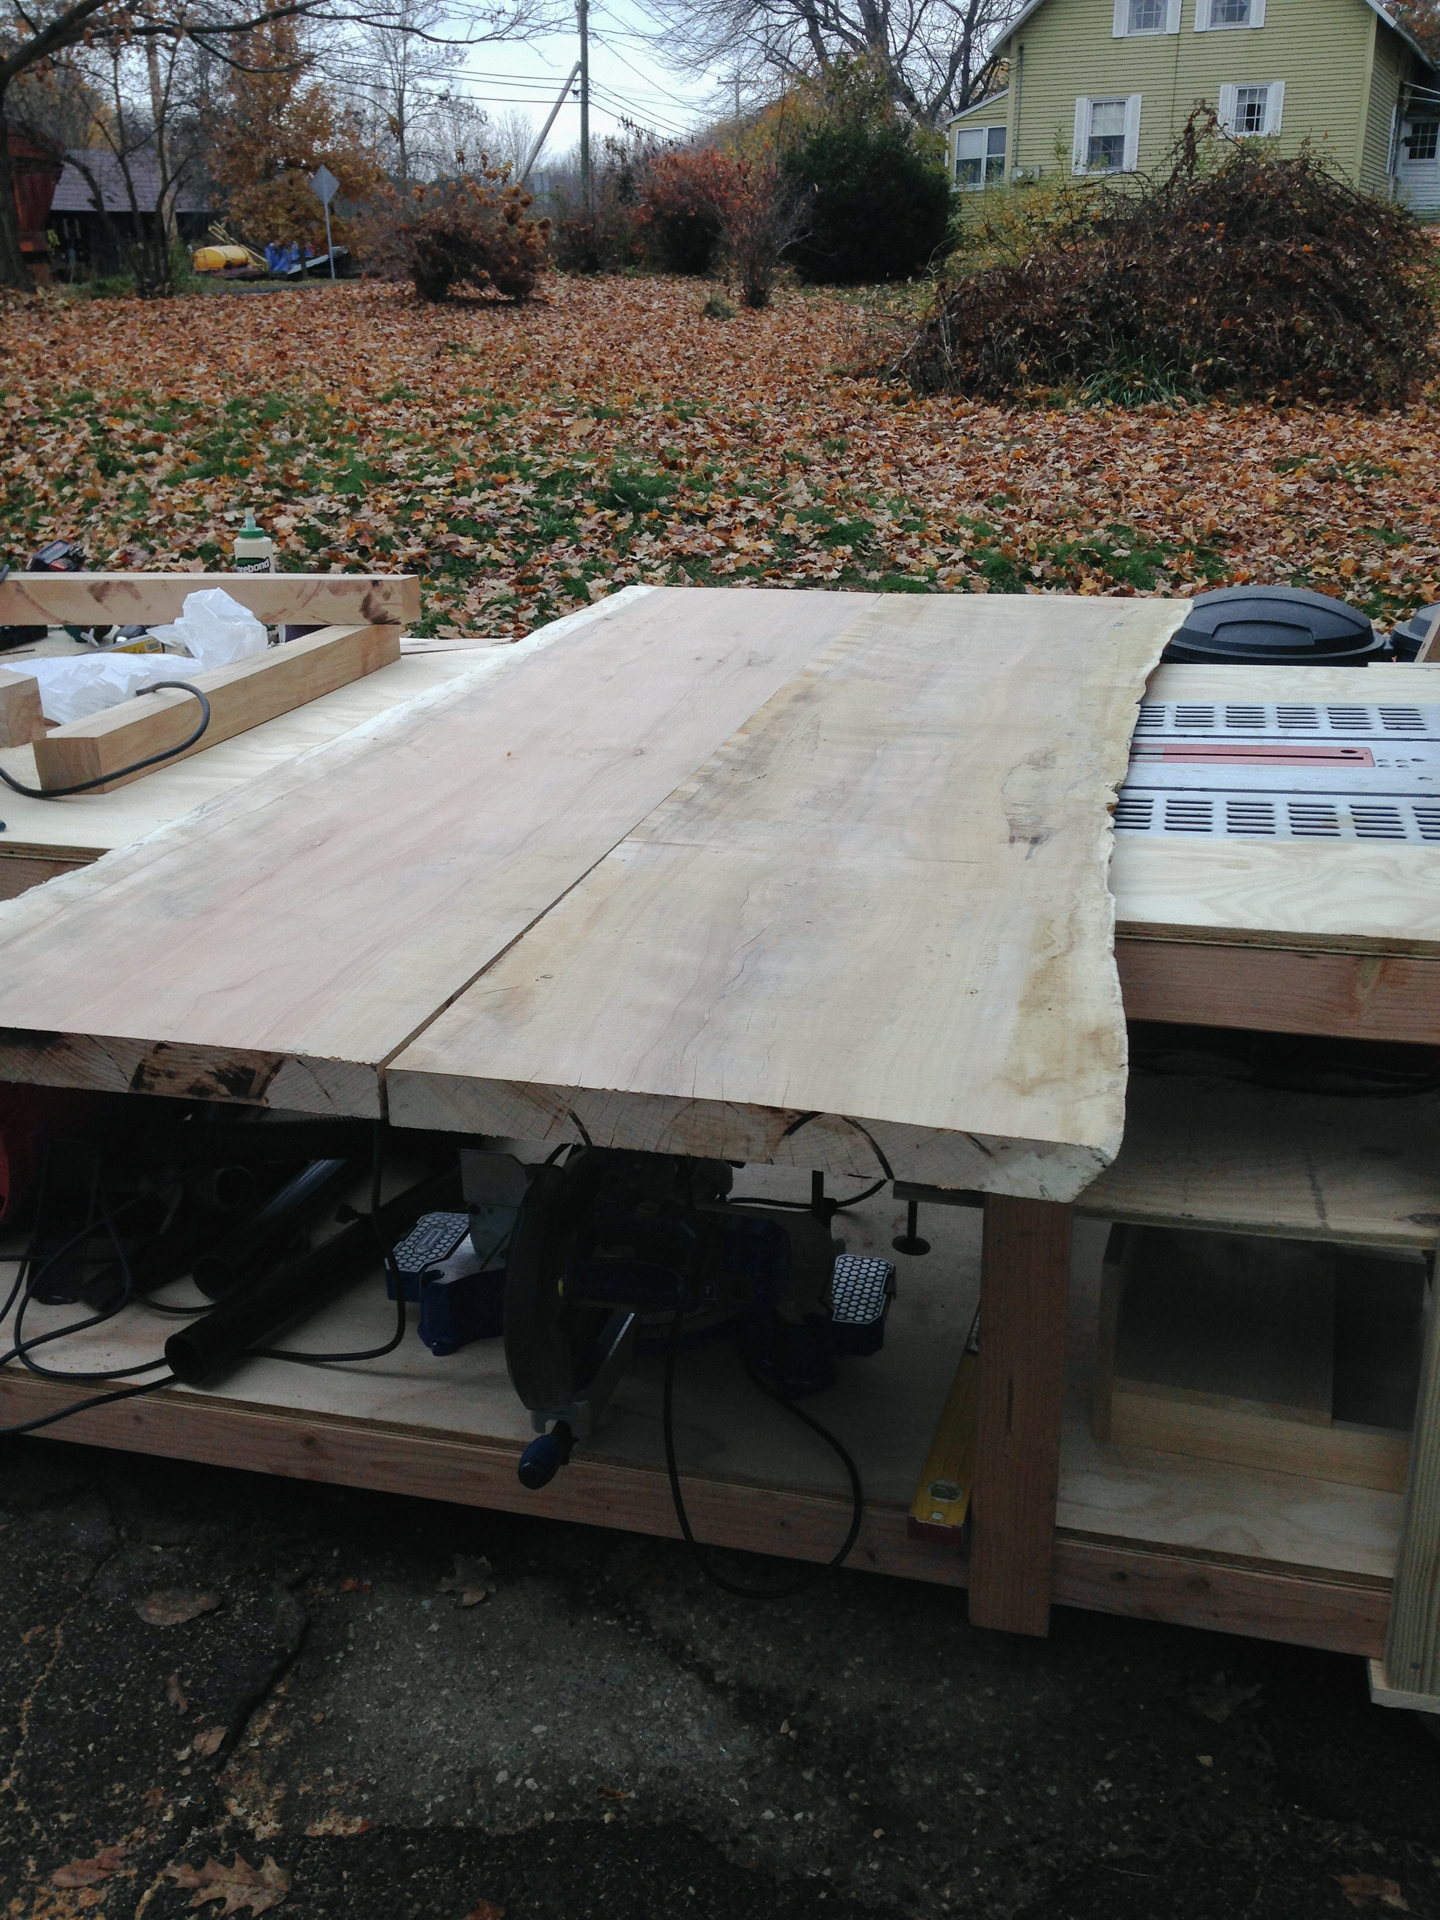
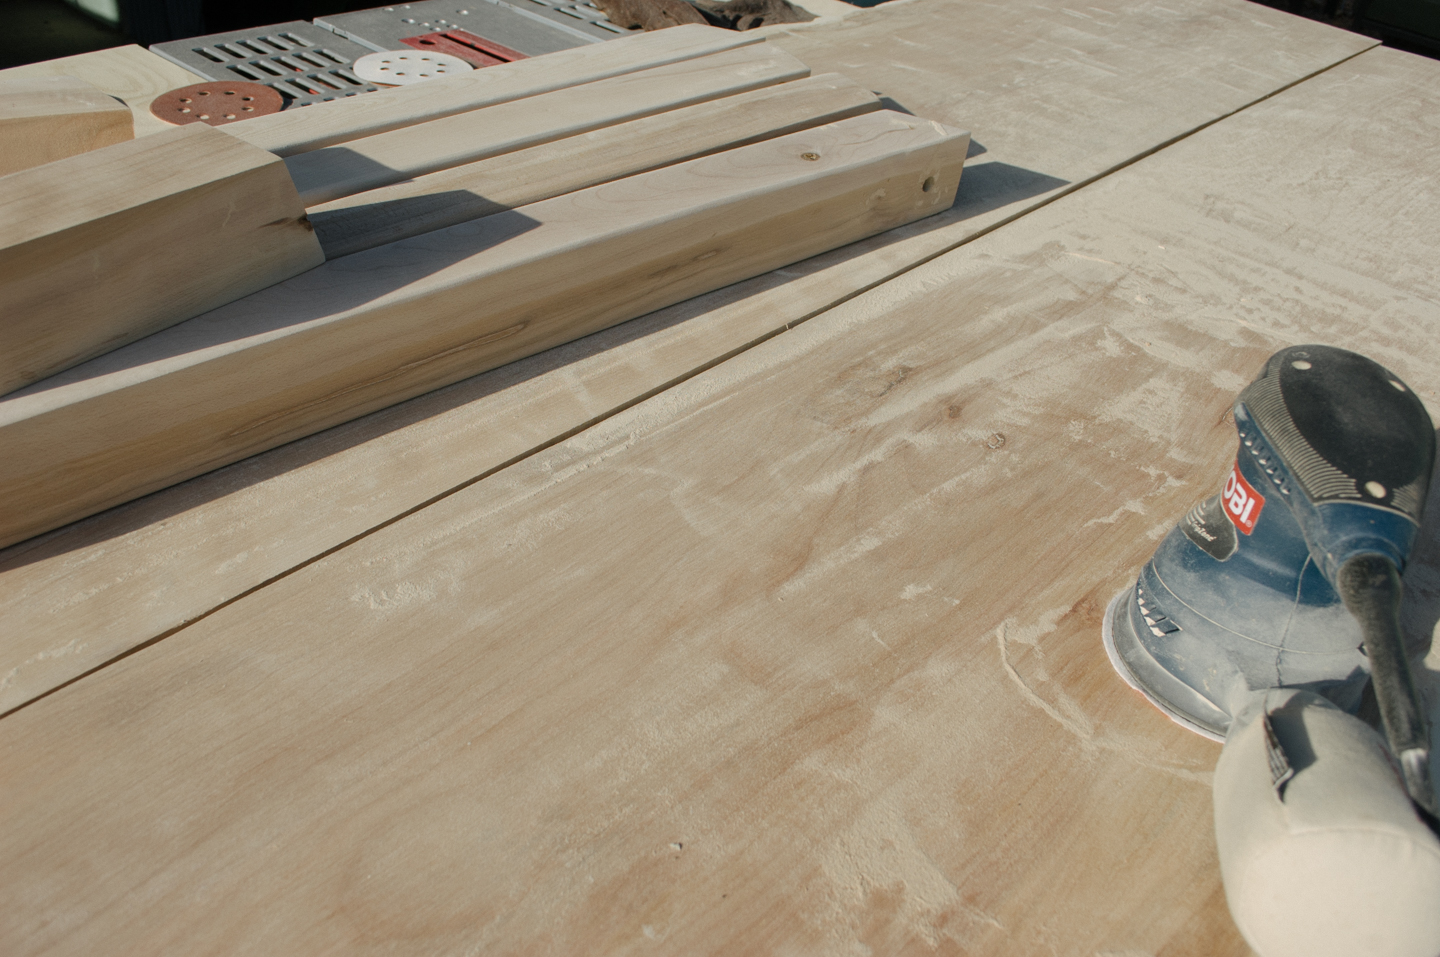
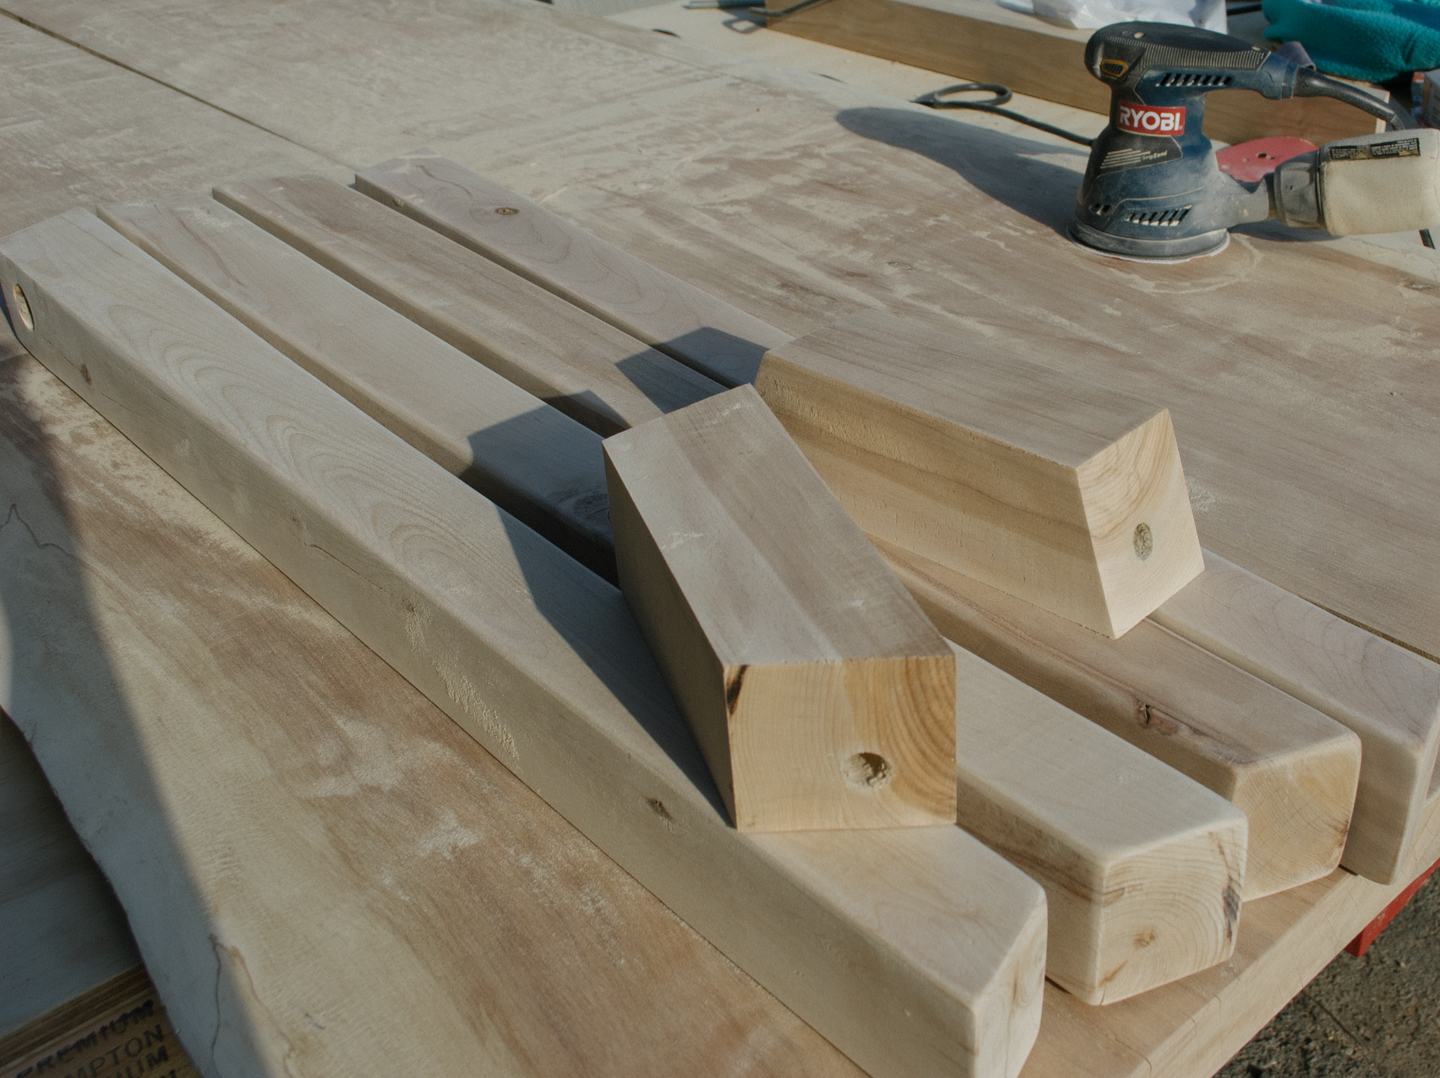
Dining Room Refresh: The Steps We Took

1. Keeping with the Era

We have always tried to think about the timeframe in which our home was built when making design decisions. Sadly for too long we believed this home was originally built in the late 1800's and was just a cabin/cottage originally. In Mid- 2015 on our fifth Anniversary we went on a deep hunt for more information and stumbled upon the truth.

We have one of the first pre-fabricated (brought in from the train station with horse & buggy) bungalow catalog homes in Hadley, Ma. Listed as a MA Historic Commission home; named the Benjamin Denio Home.

Our craftsman window and door casings were always something we believed had been added to the home in the 20's. It didn't have enough of a traditional bungalow look (enclosed porches added in the 50's, and no front entry to speak of).

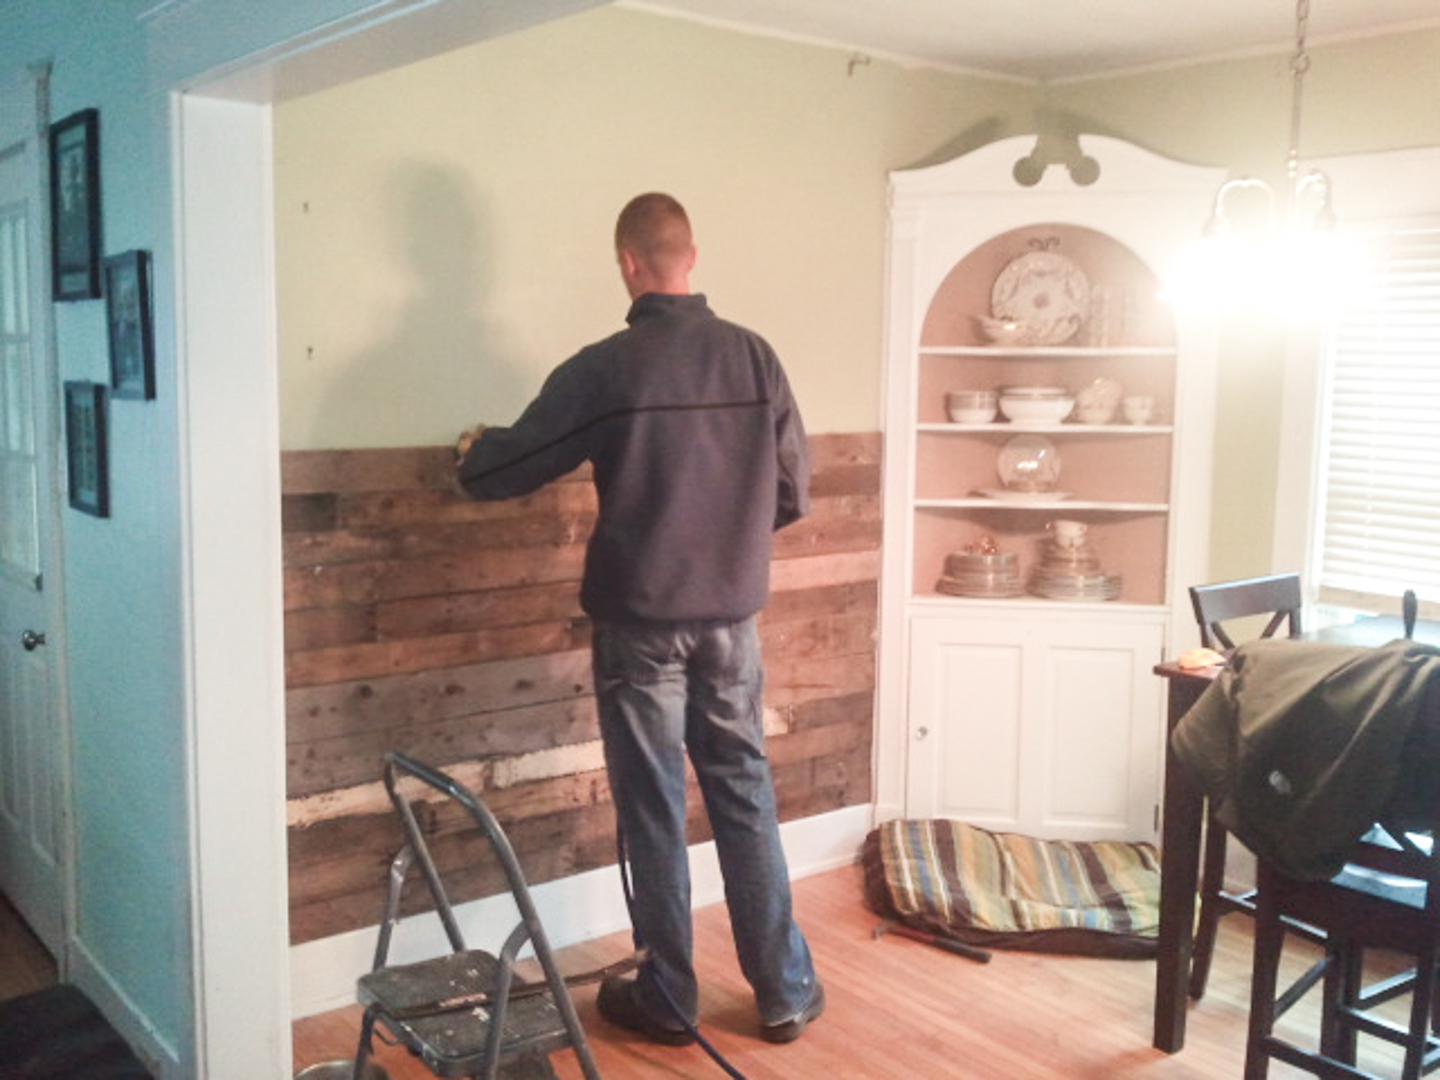
Needless to say, when taking down the wall between the enclosed porch and dining room, we made sure the opening mimicked the current 9' opening in the household.

This post may contain affiliate links. Read the full disclosure here

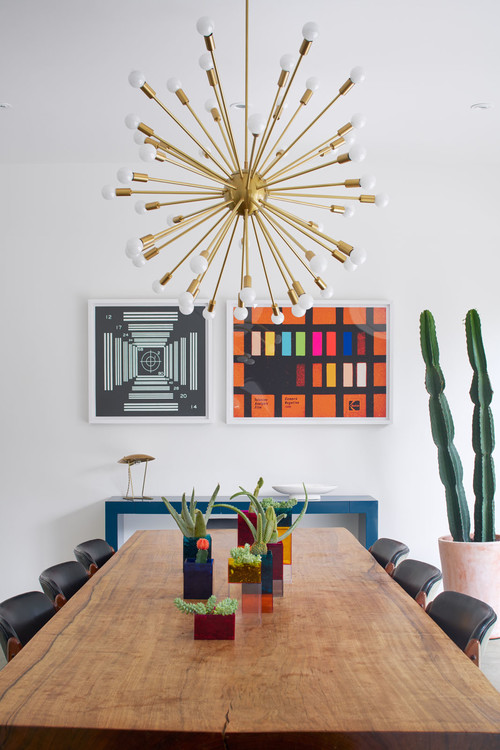
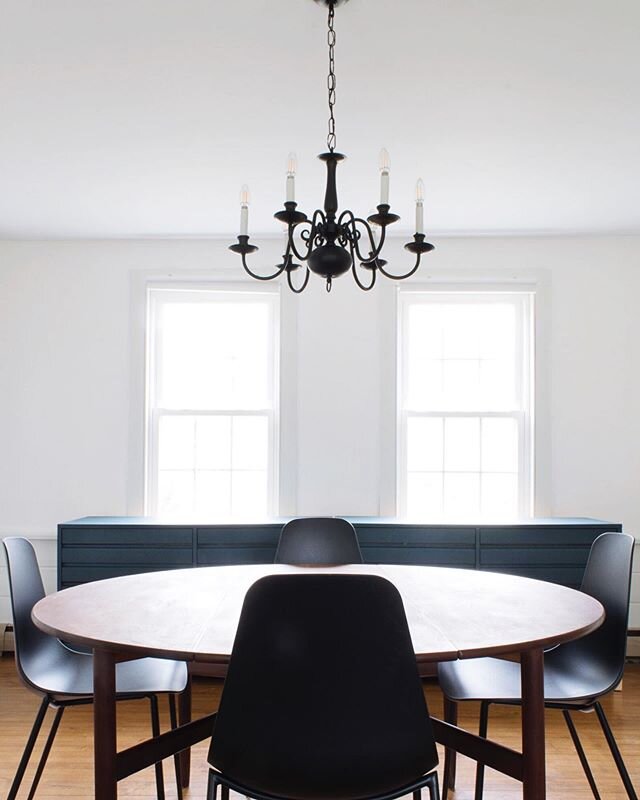
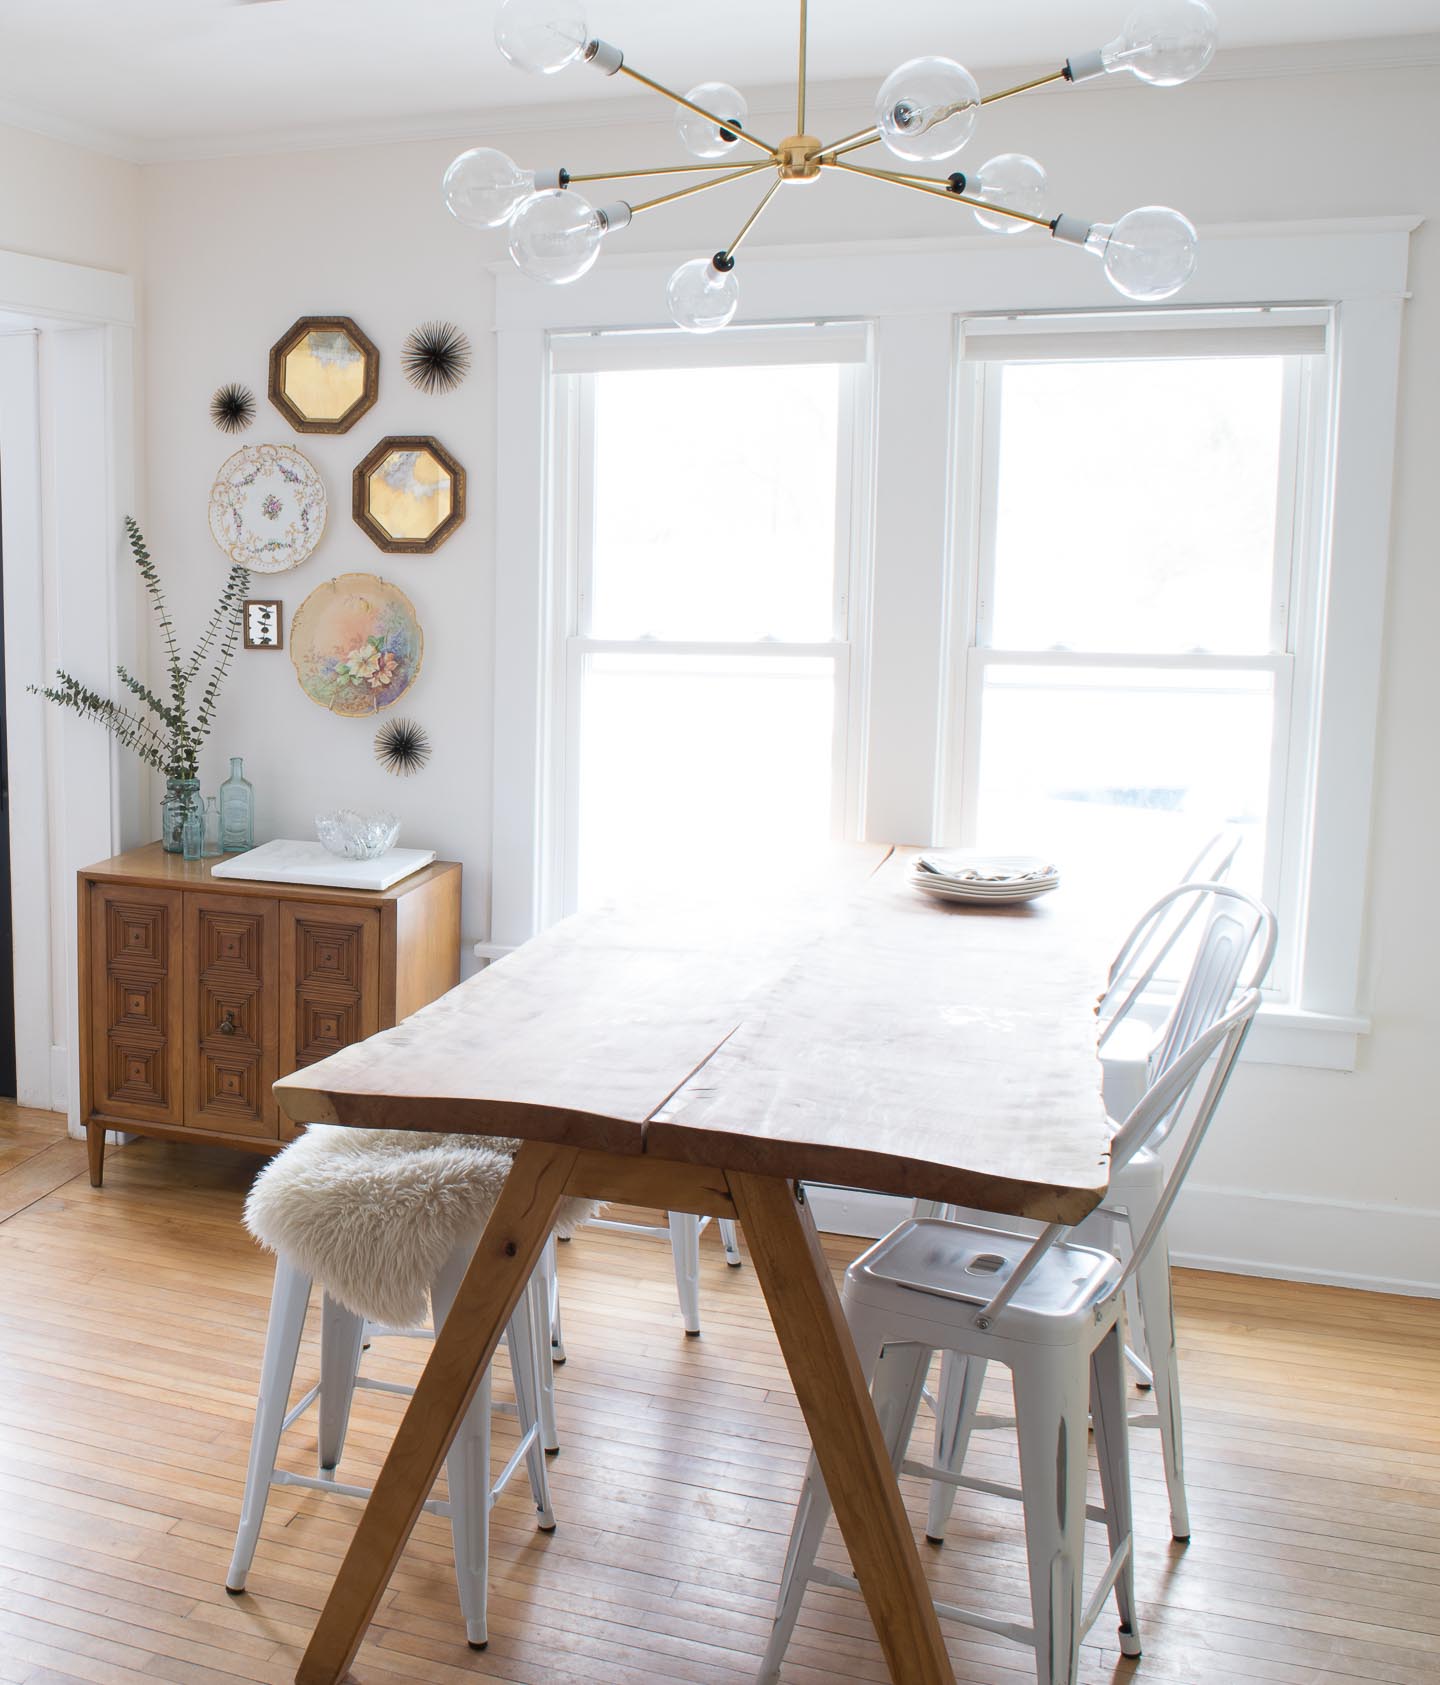
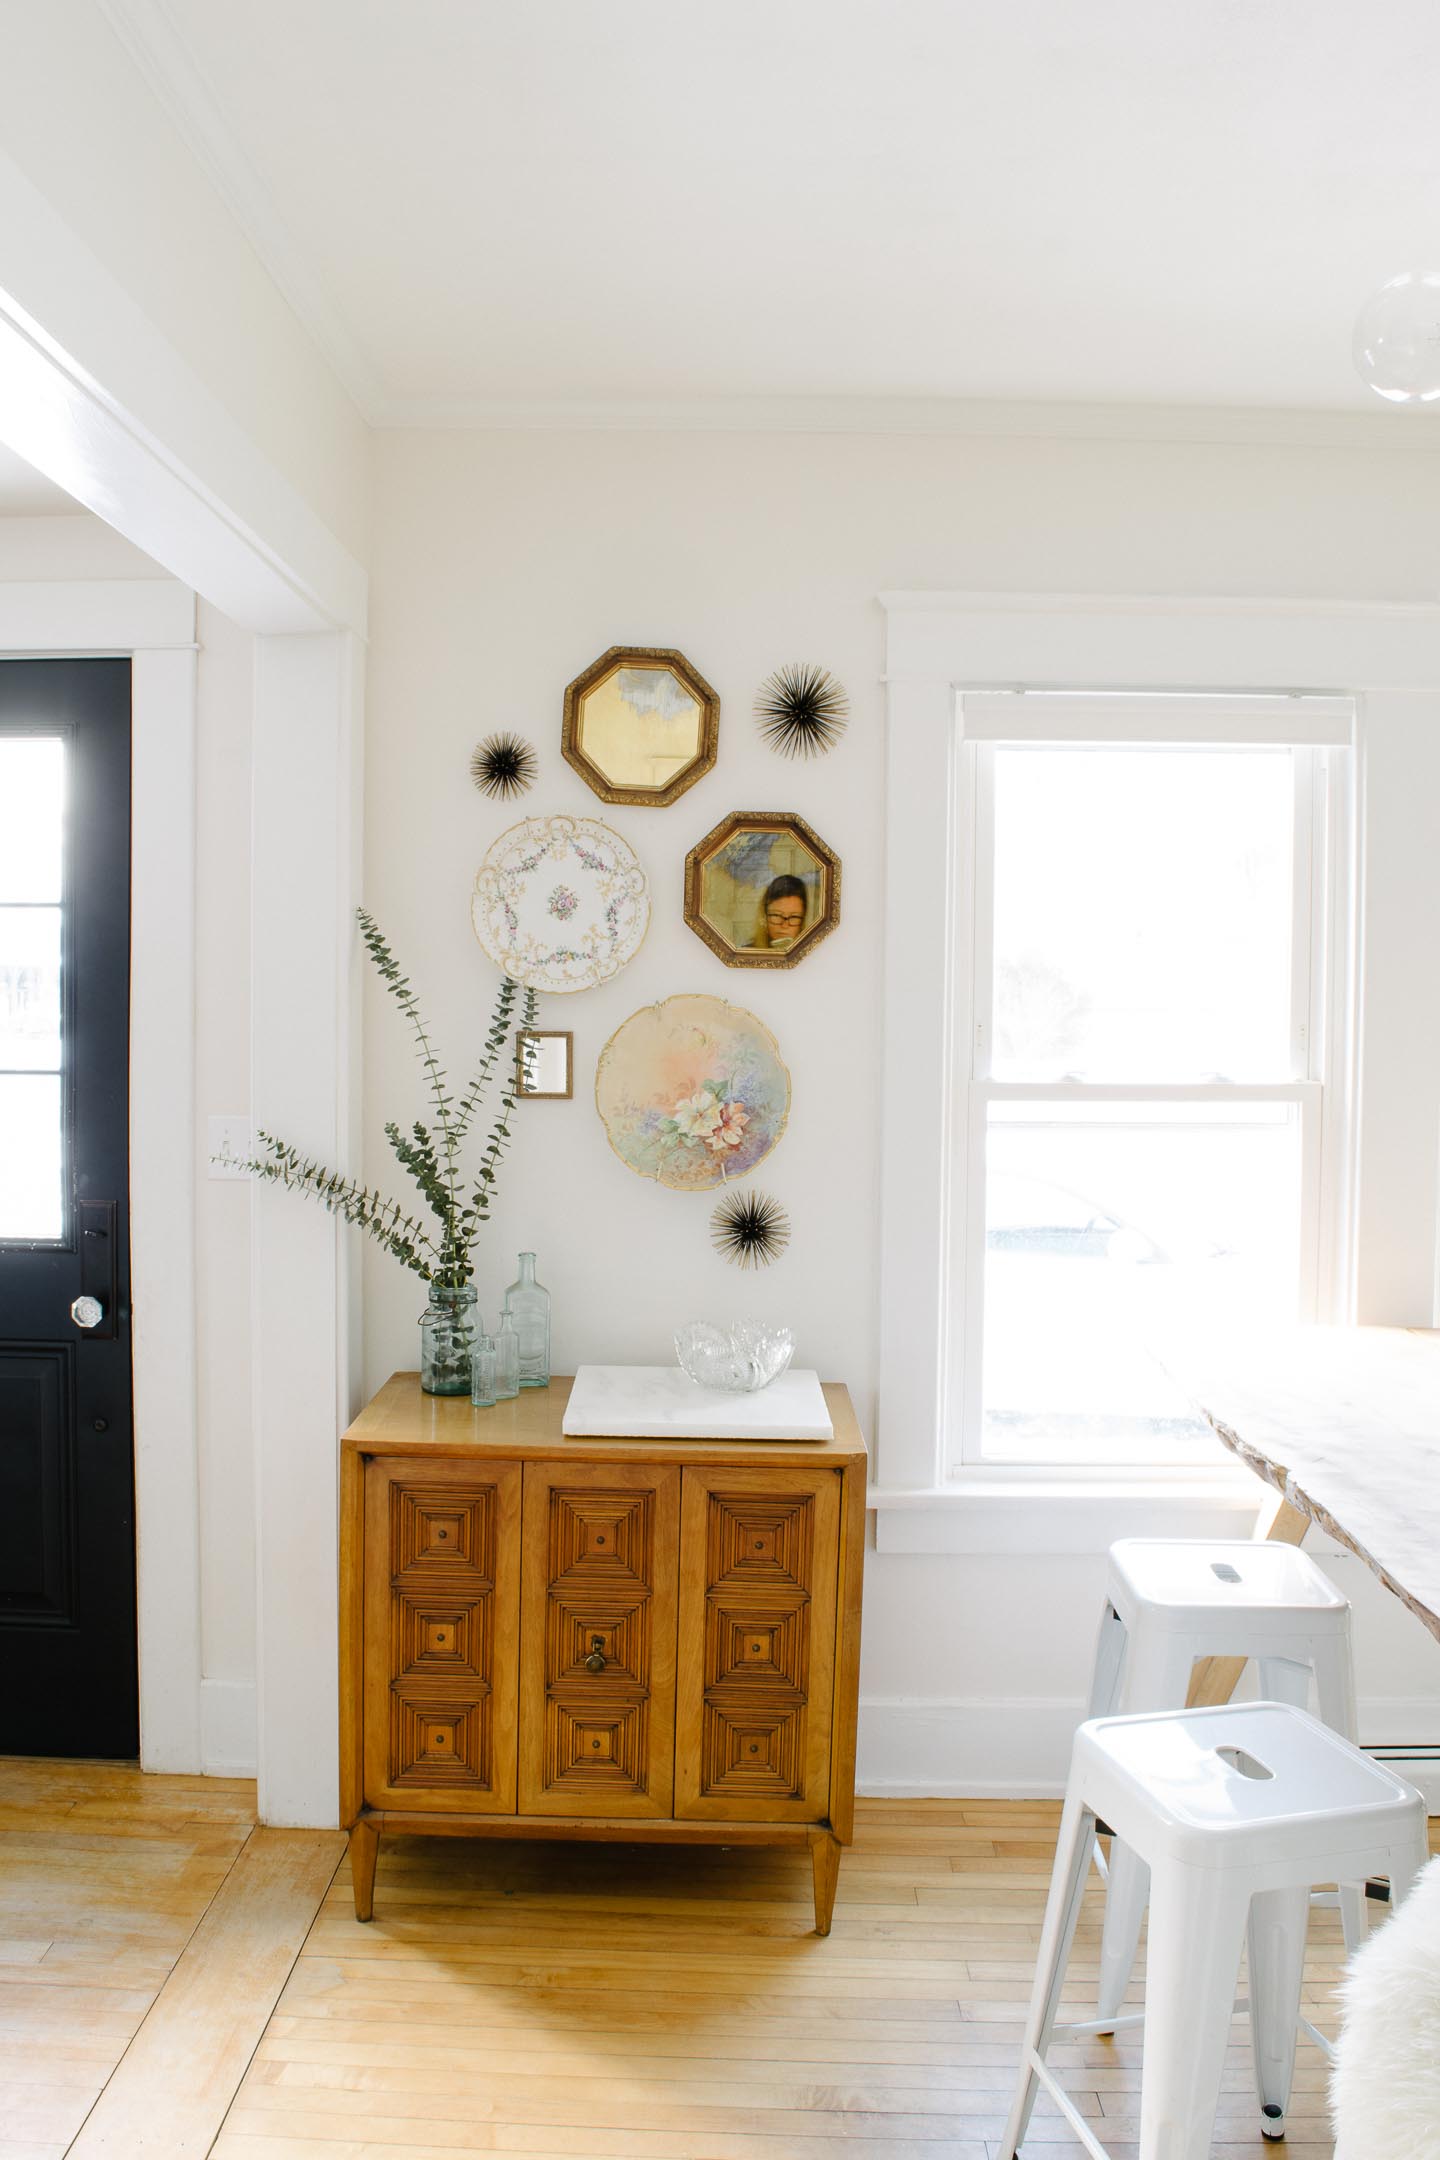
2. Add Something Bright & Shiny (or two or three)

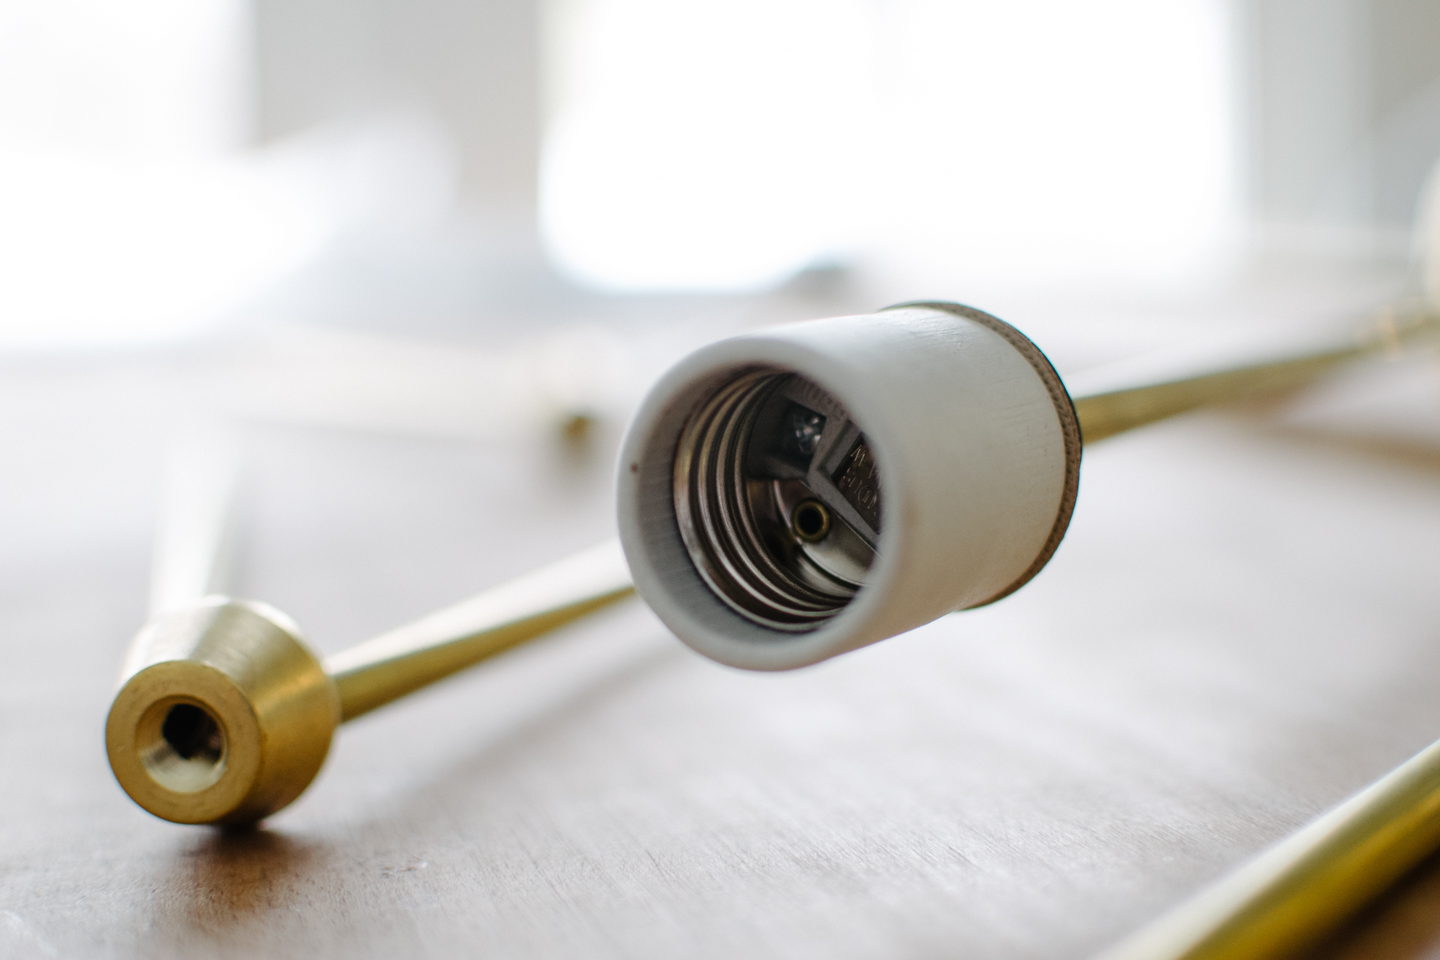
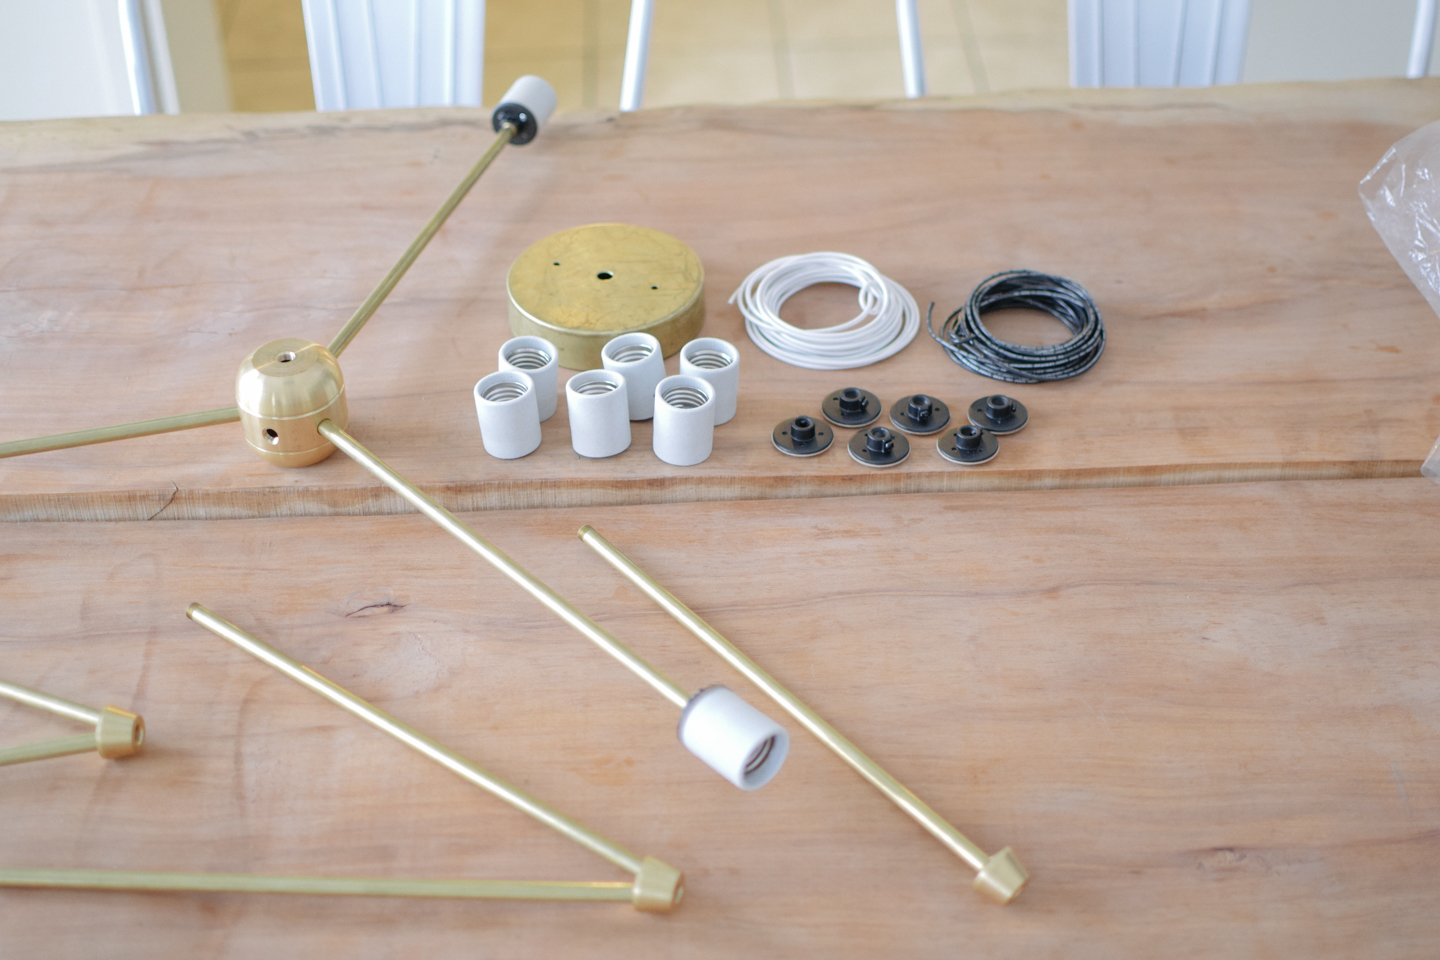
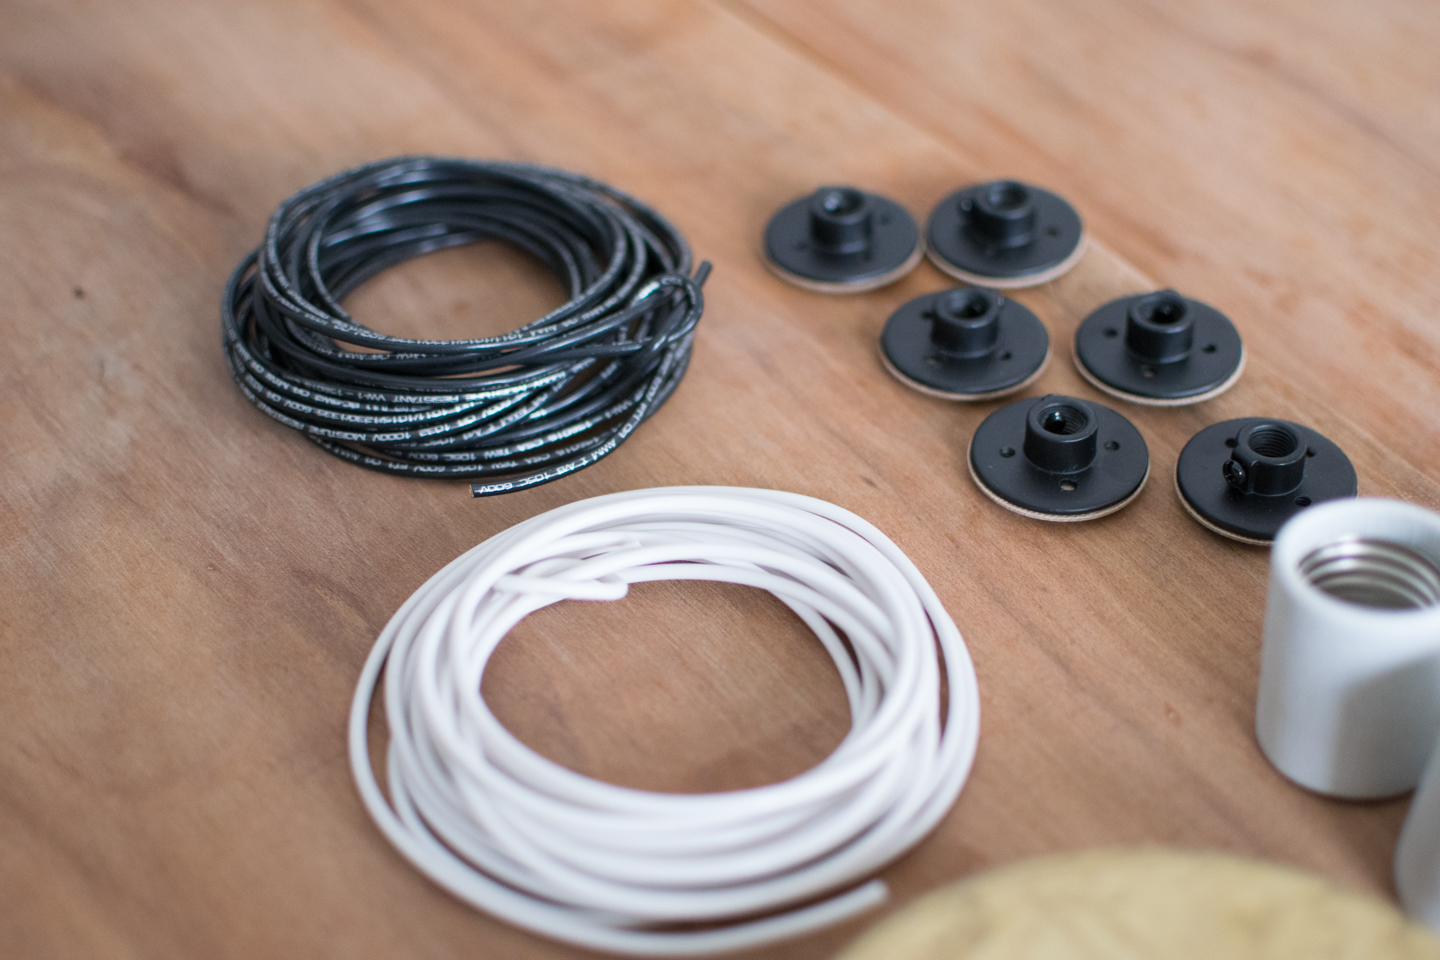
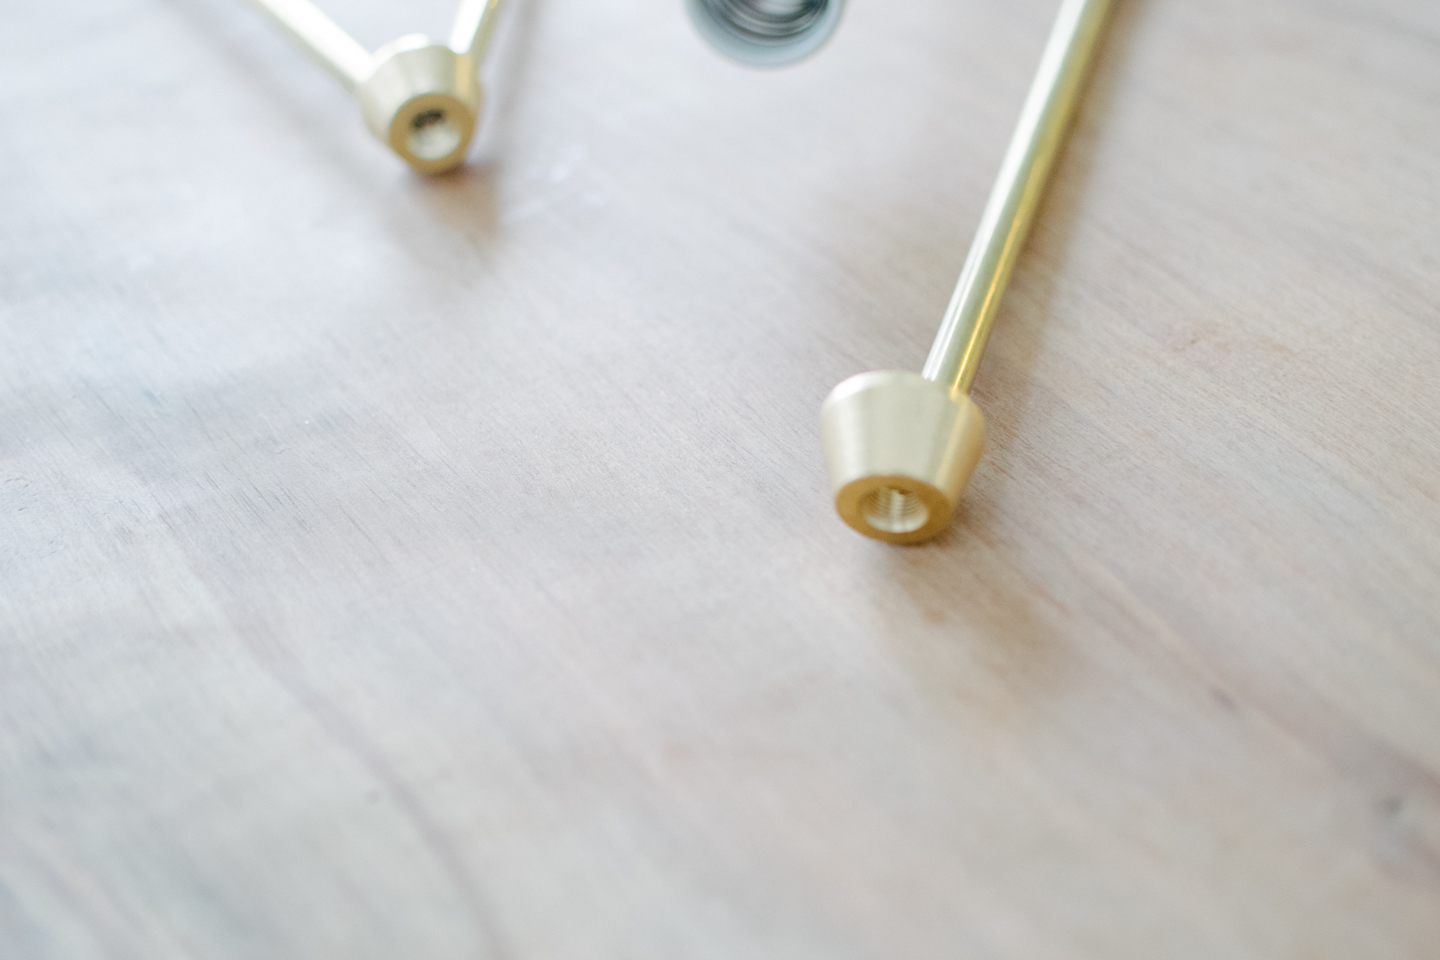
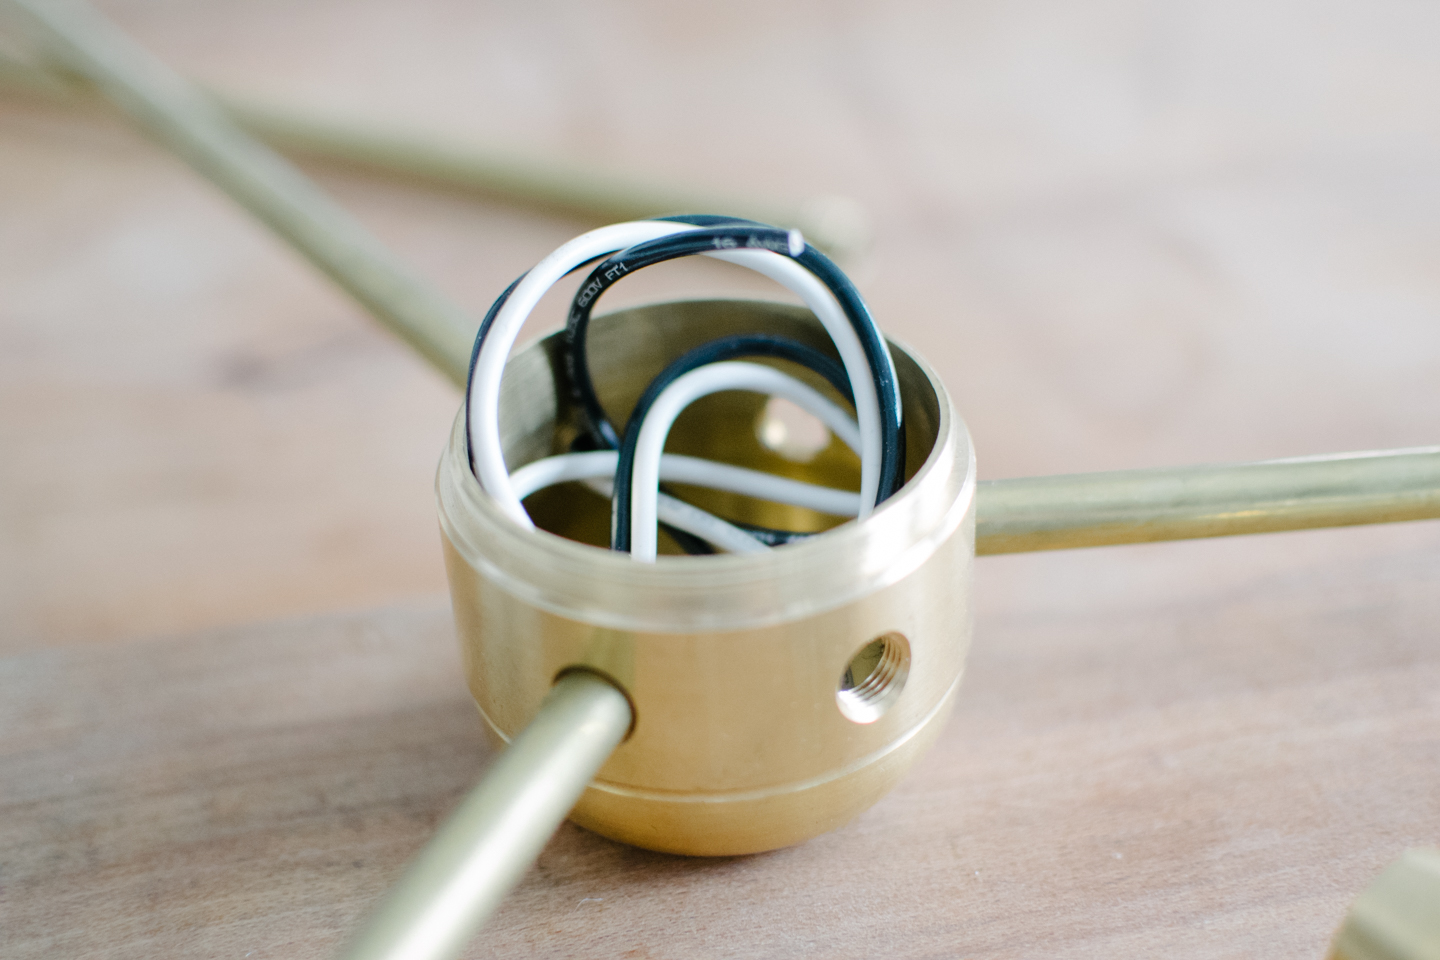
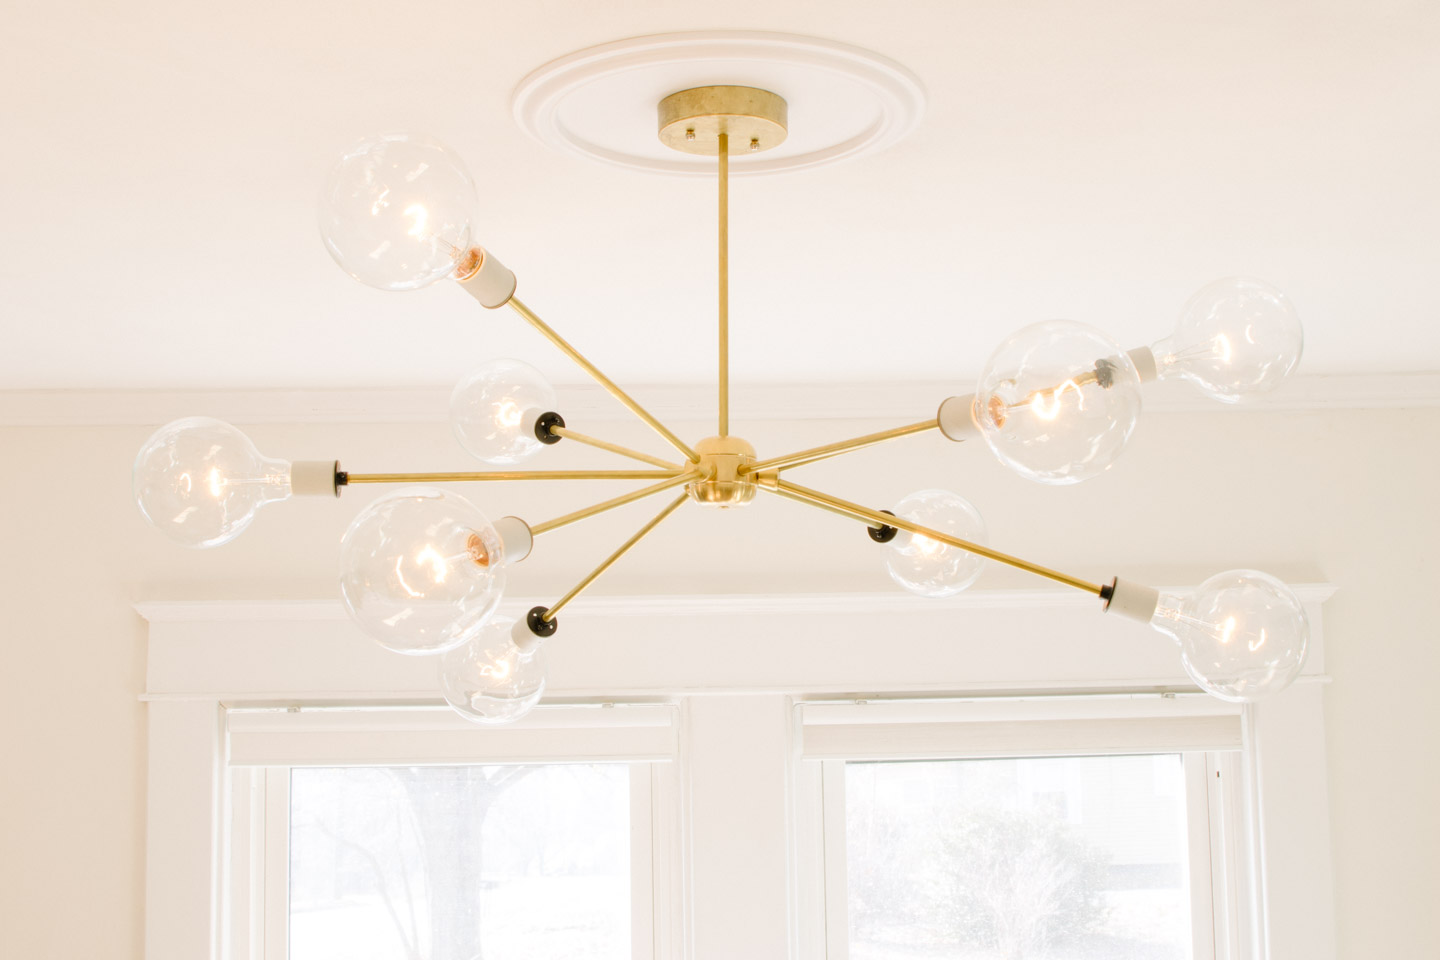
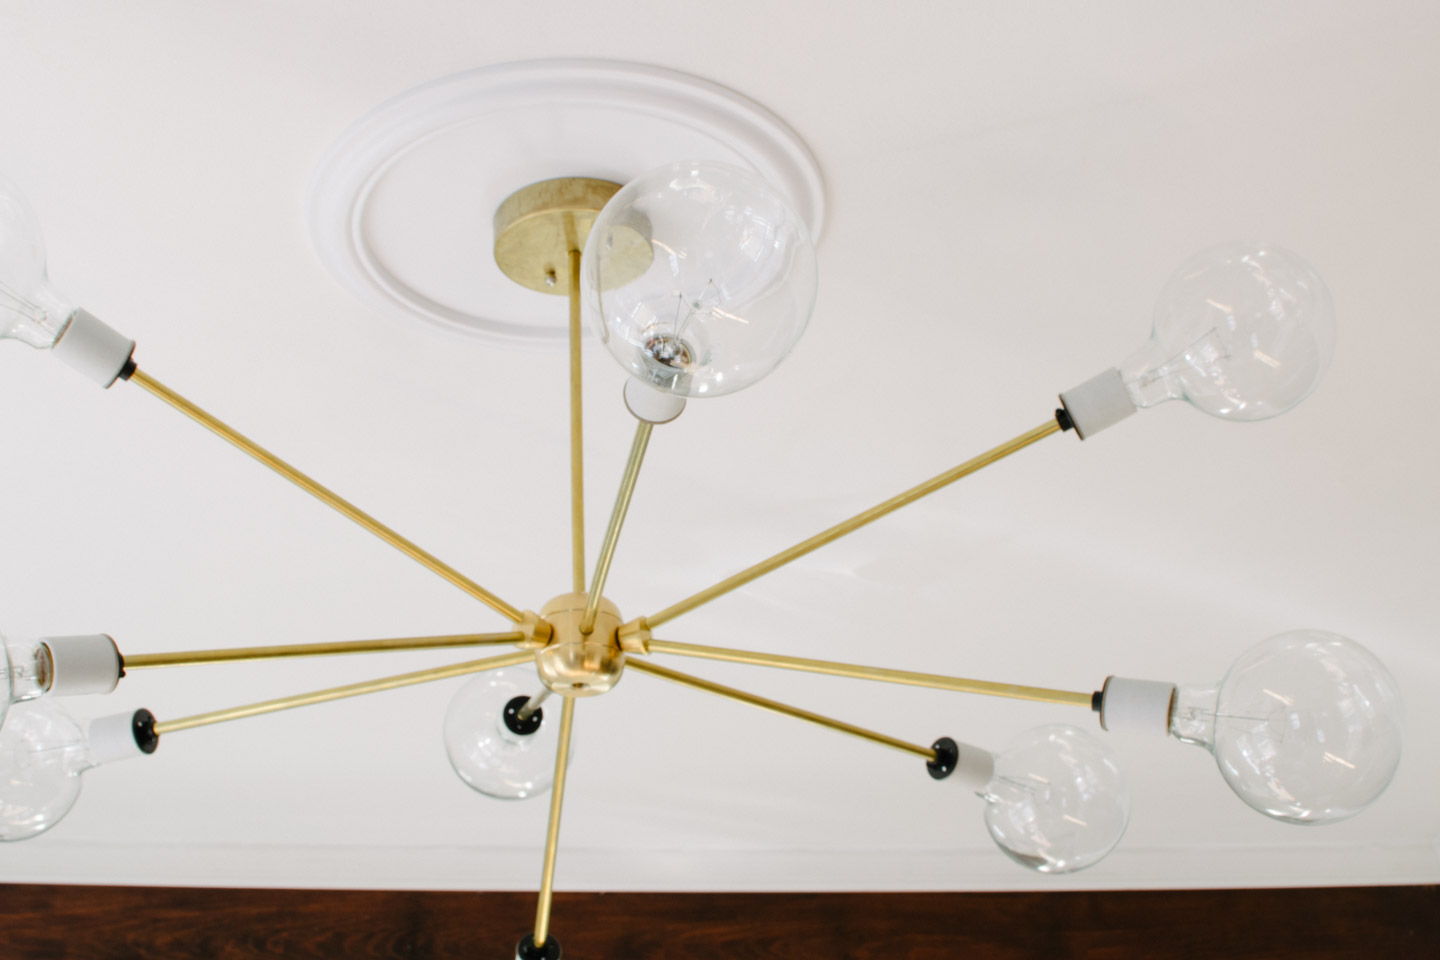
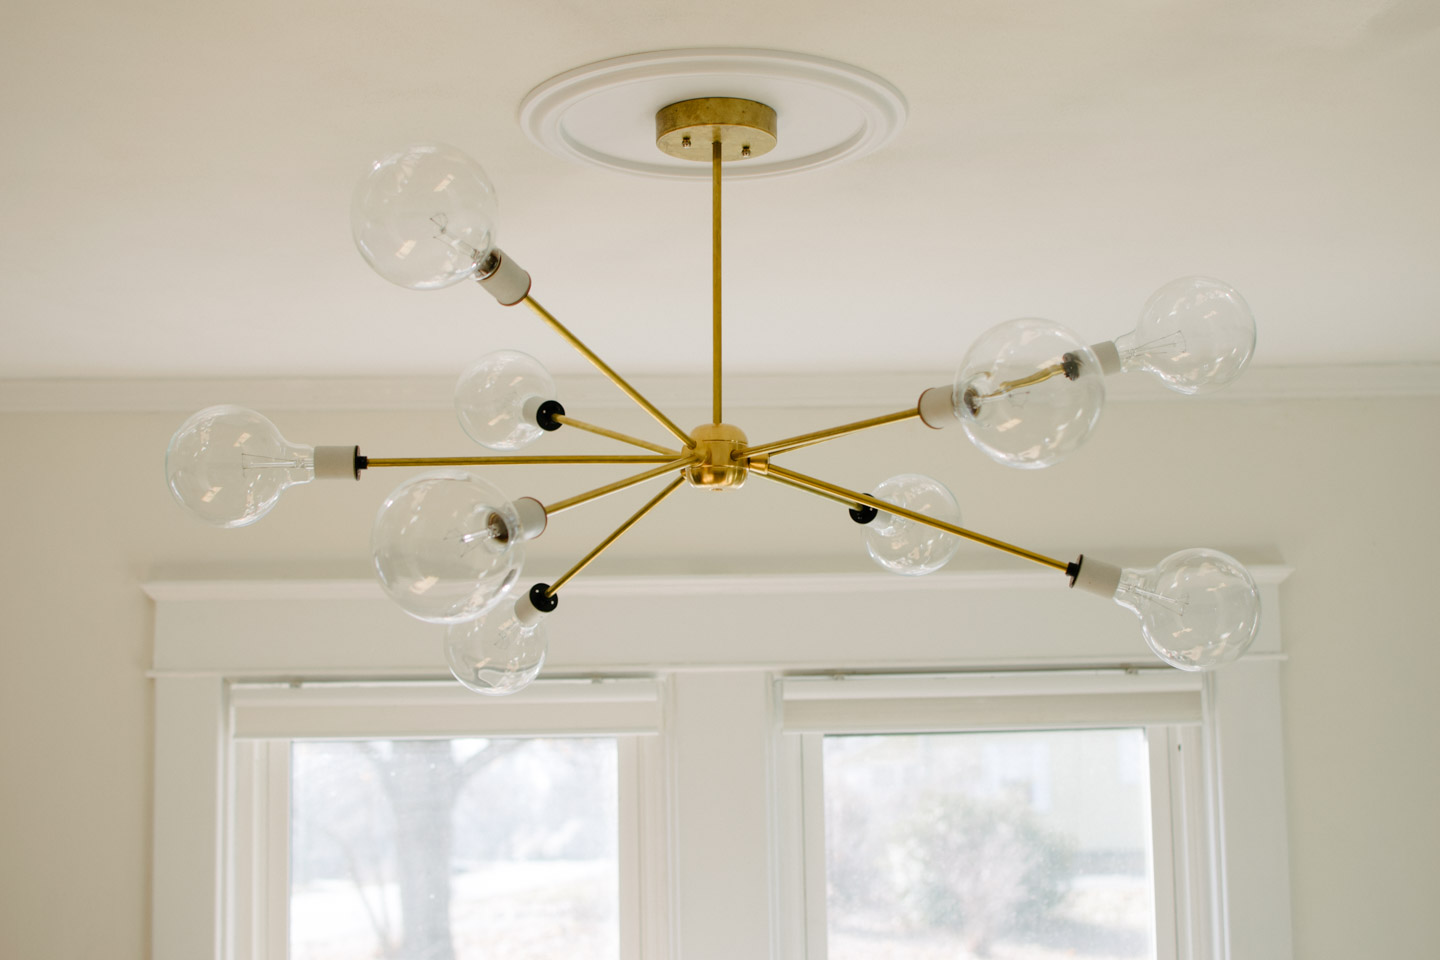
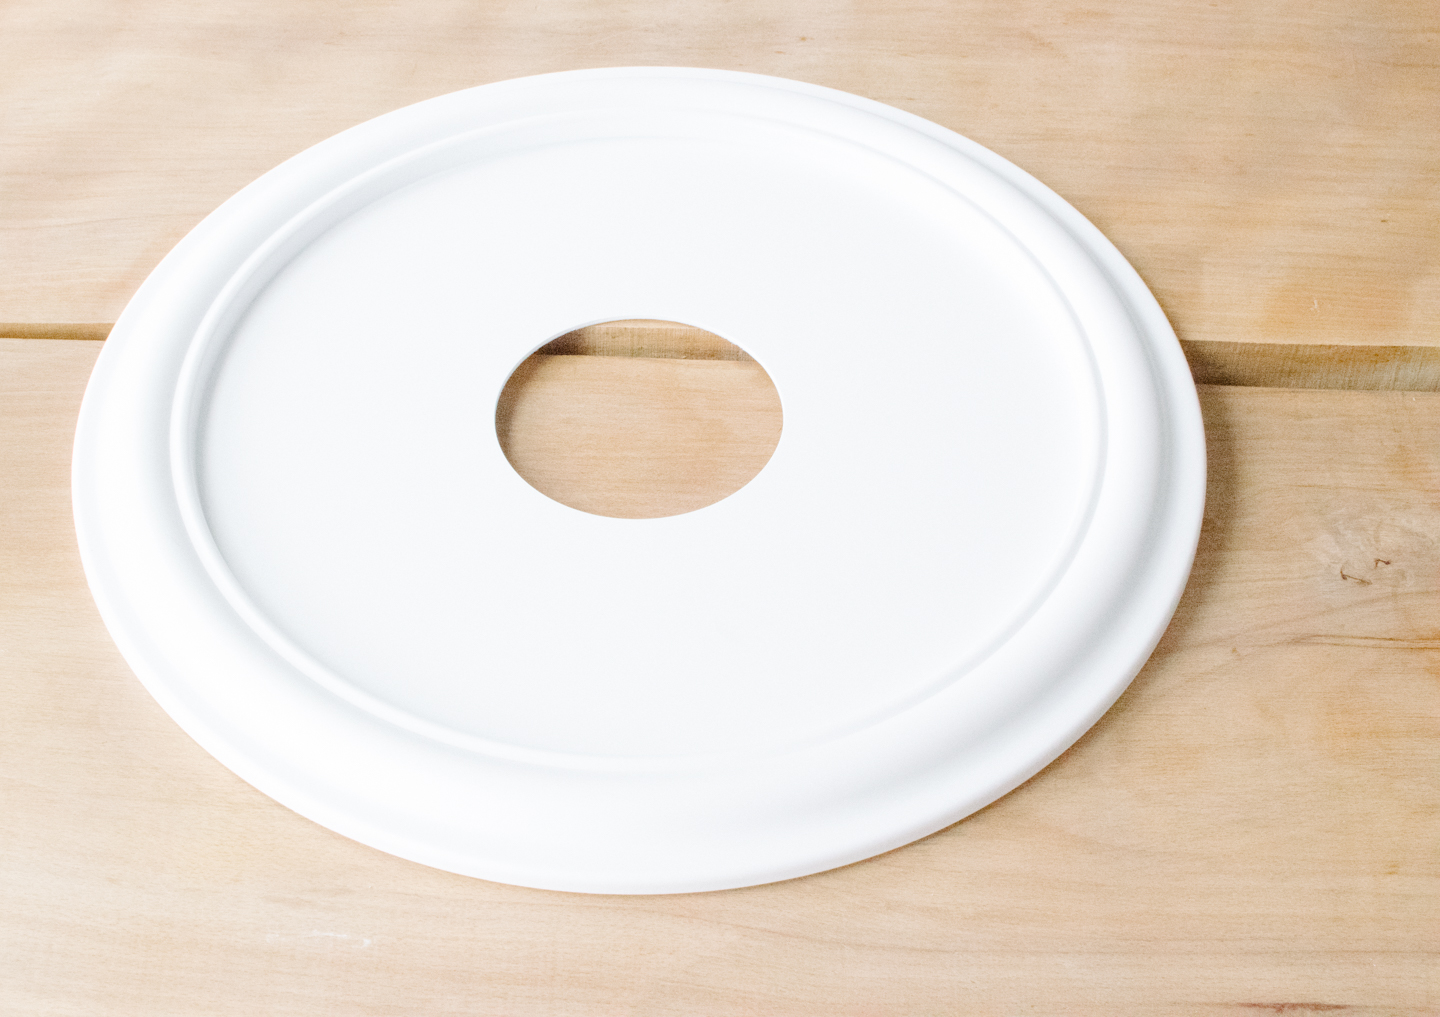
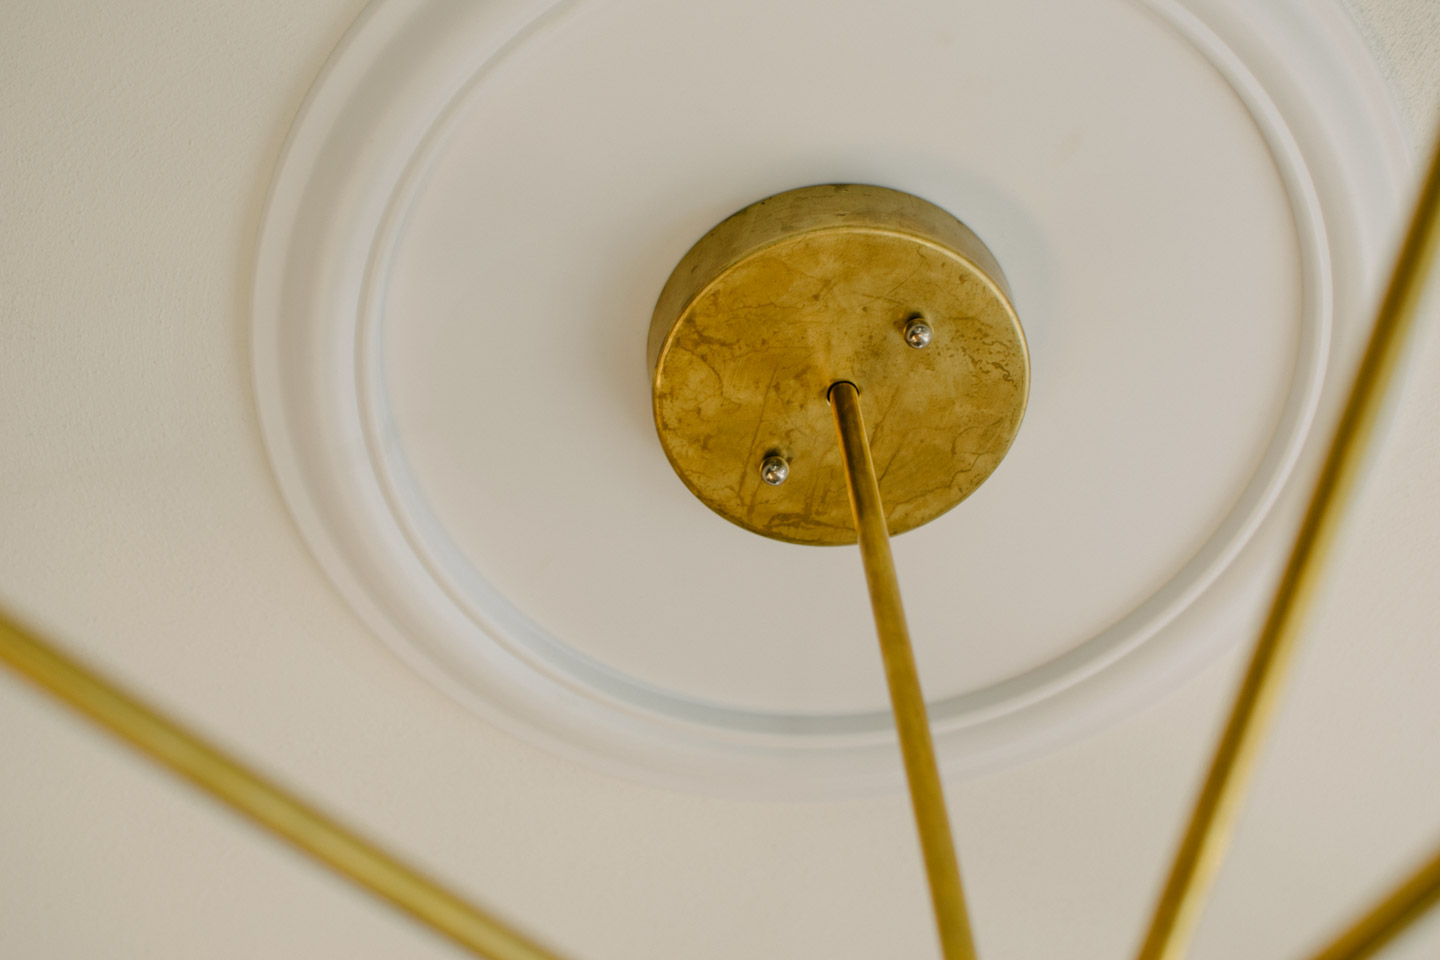
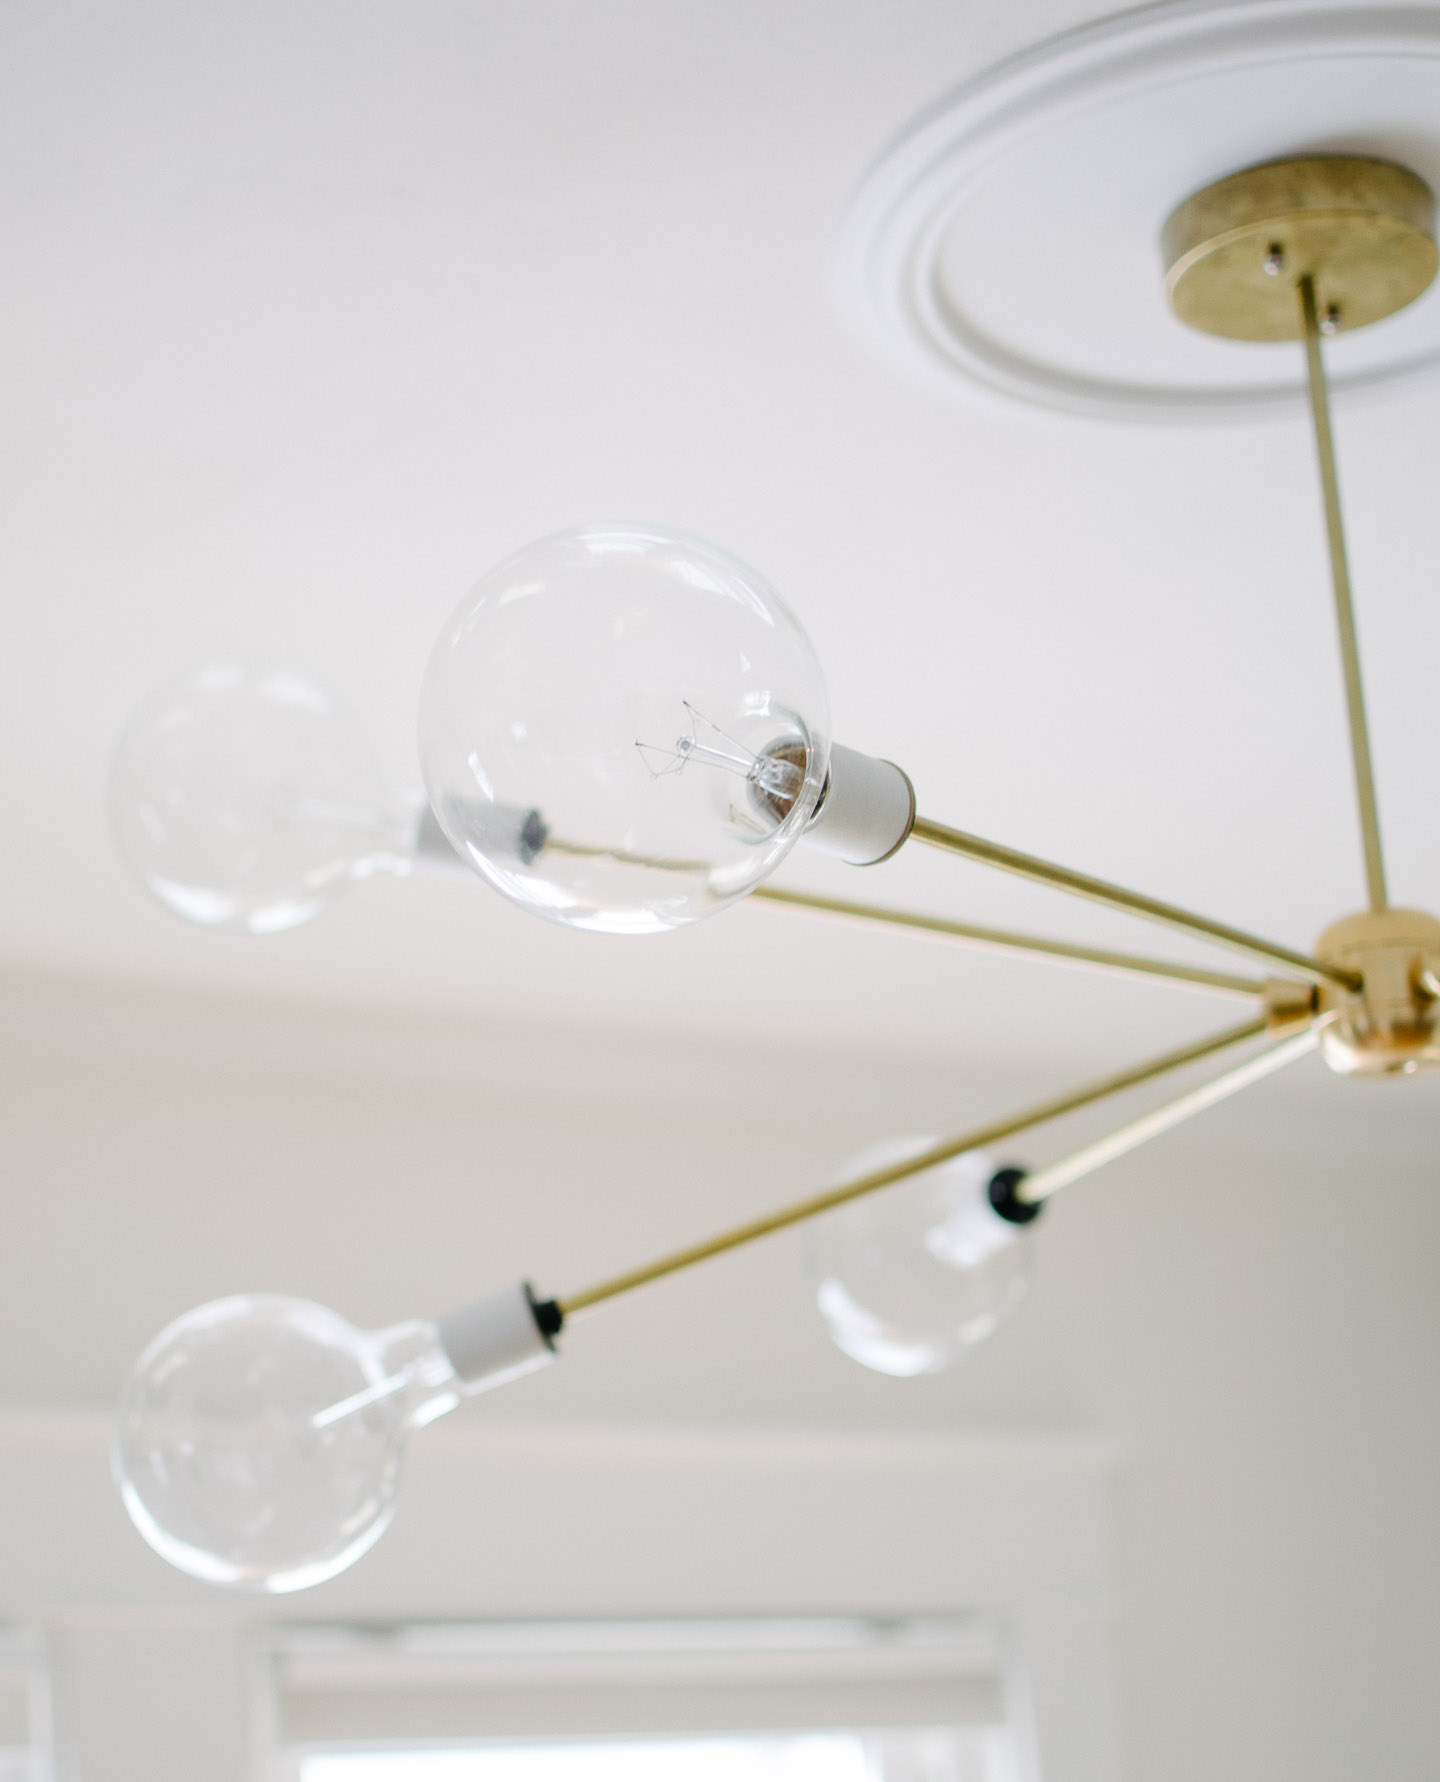
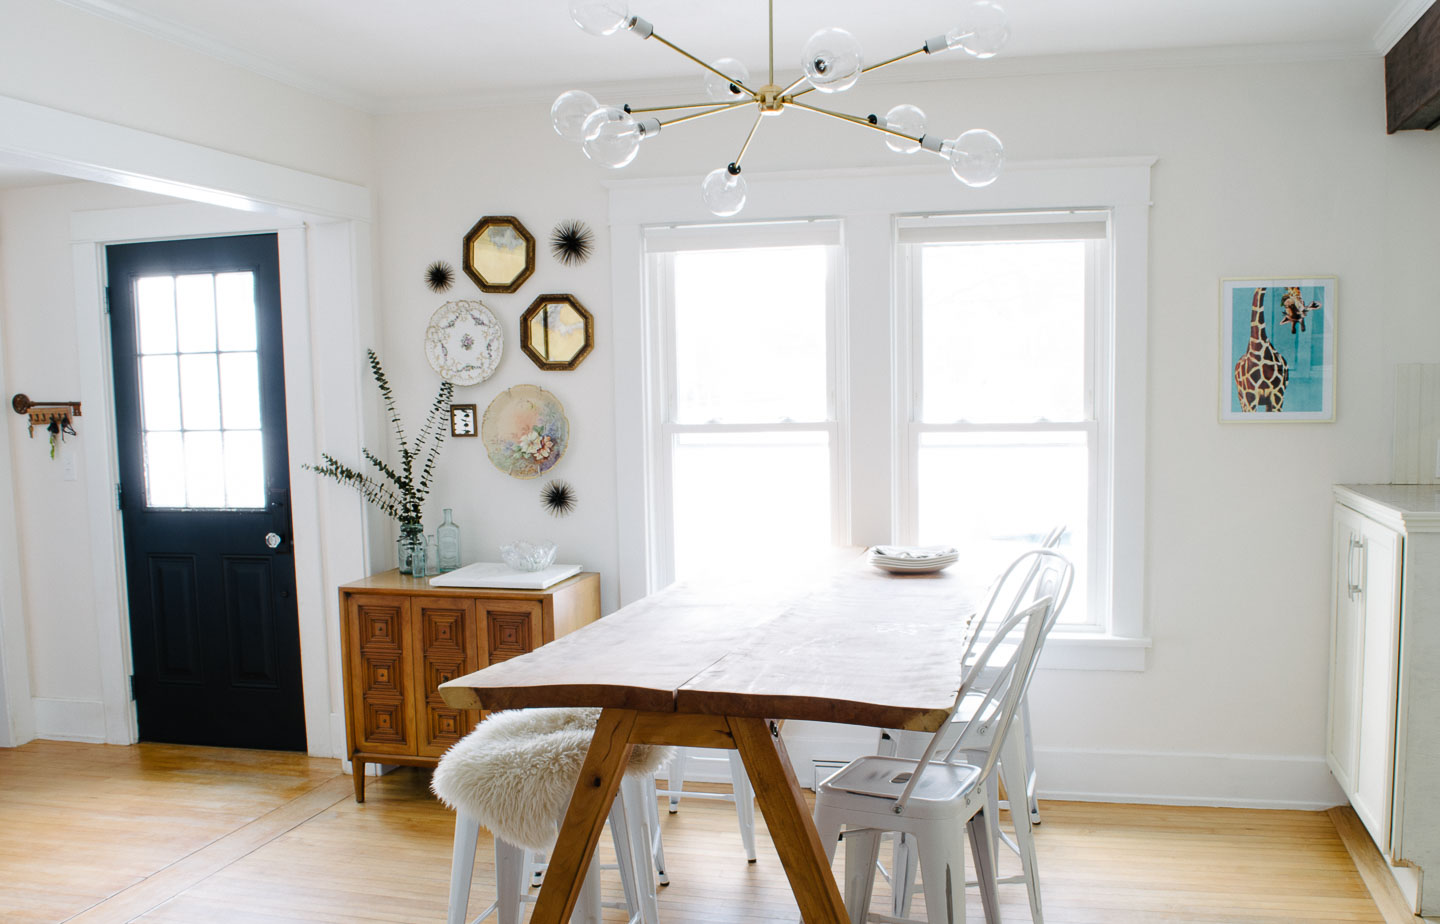
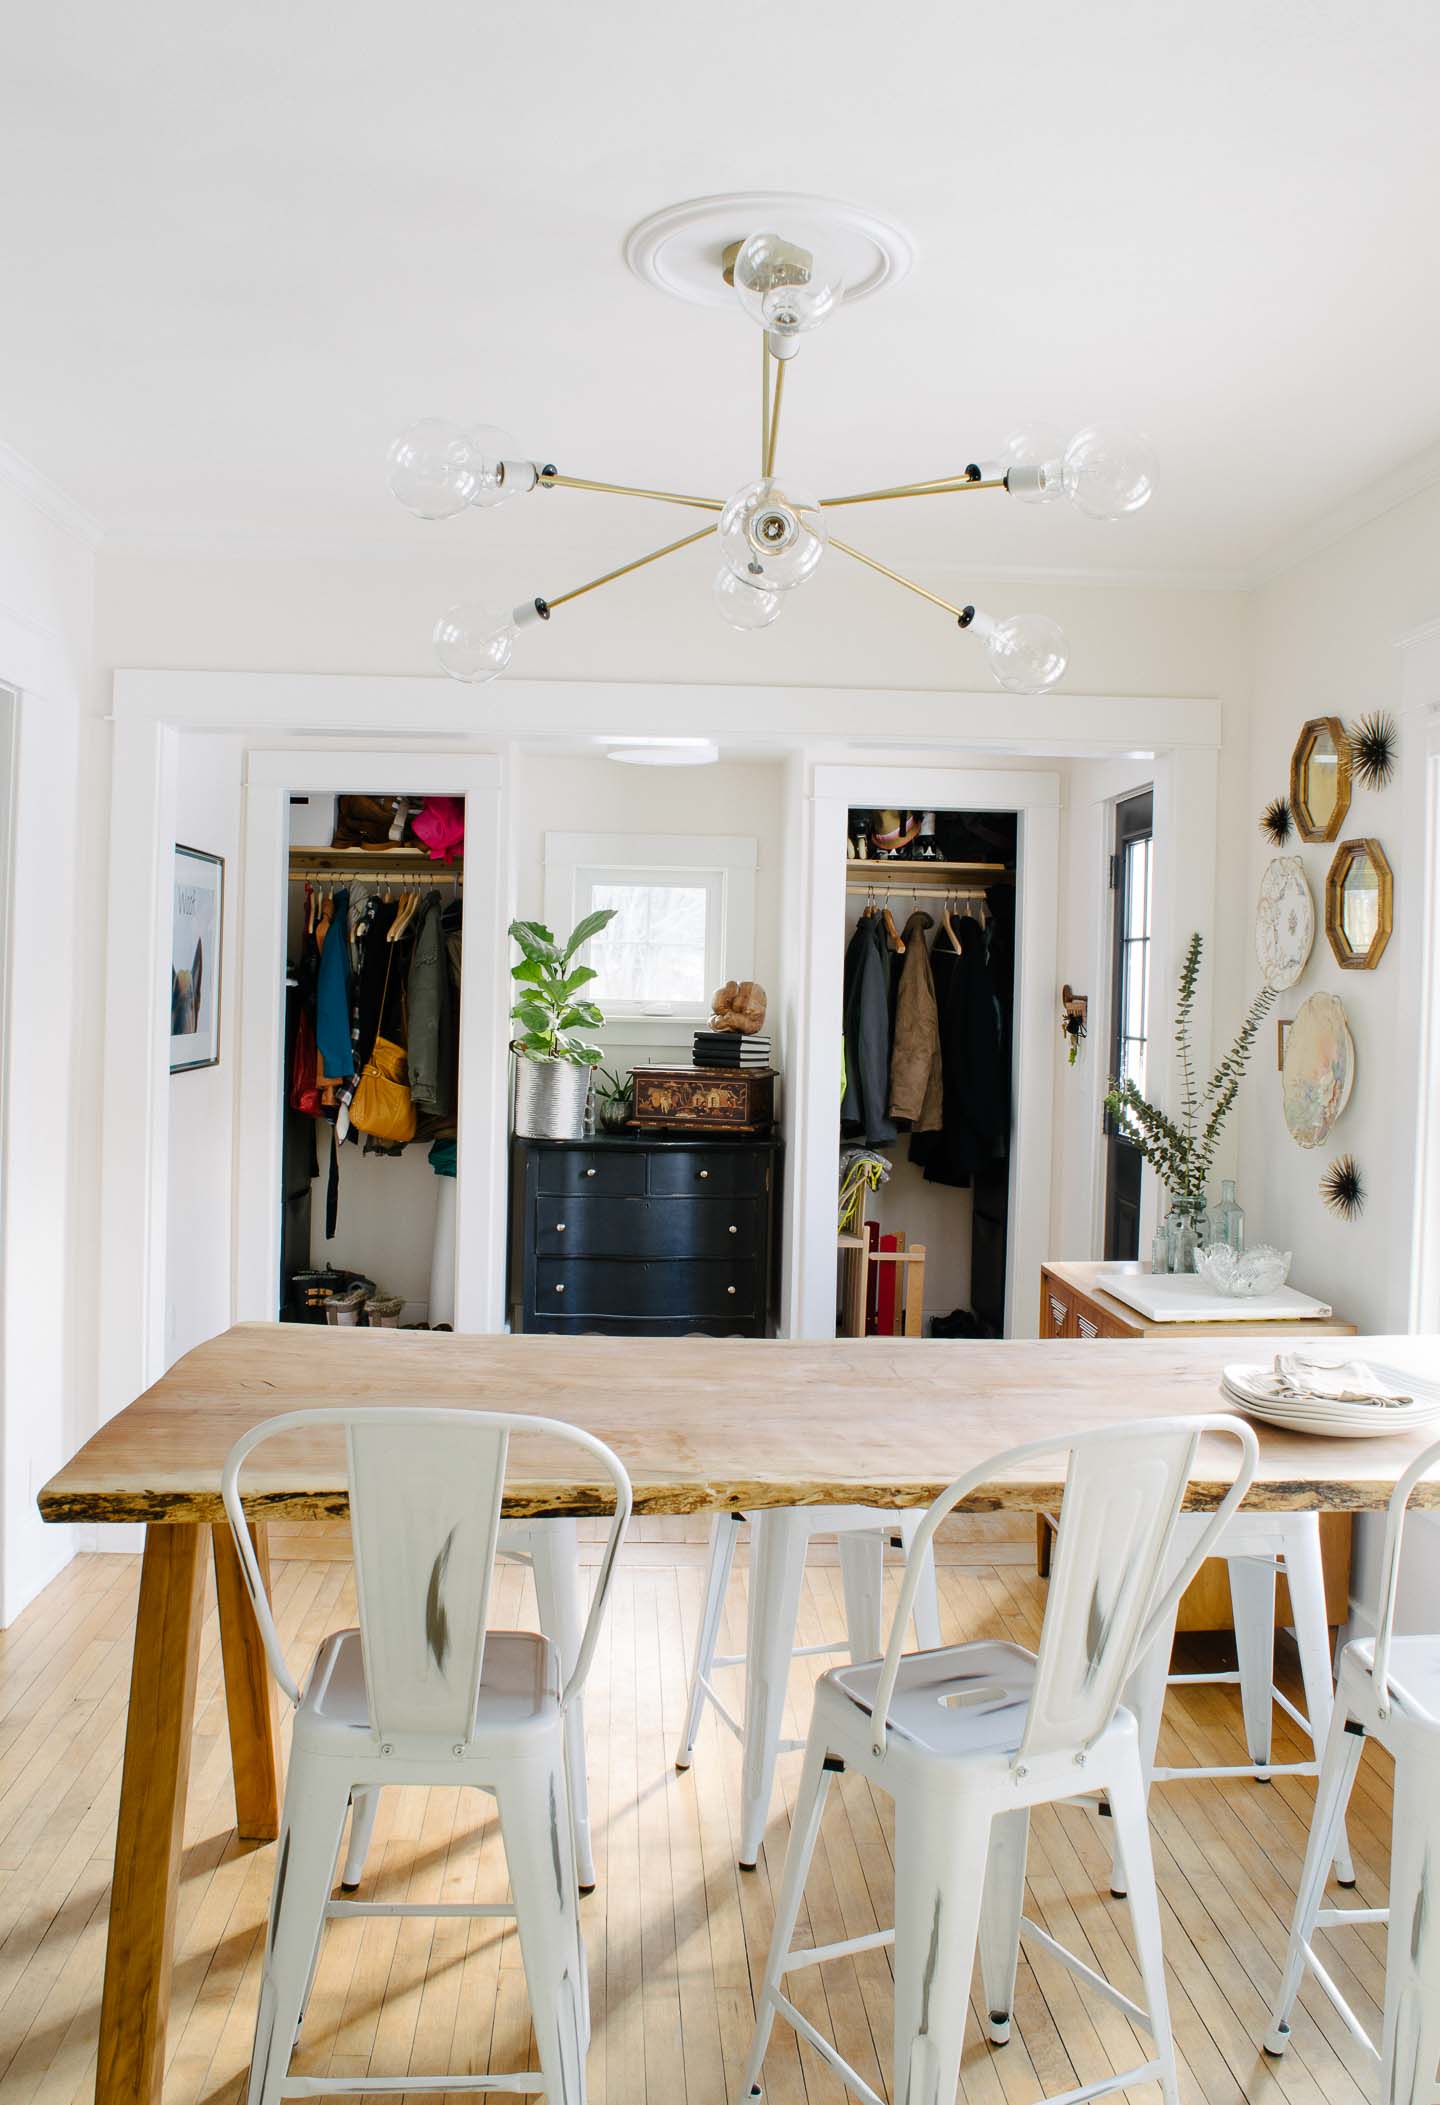
You can read the full tutorial on our DIY sputnik light here.

I really wanted a light fixture that would really brighten up this space and provide adequate light when working on projects. We hit the jack pot with this fixture and made it at a price we could afford, the fact that Haverly calls it "bubble light" is just icing on the cake.

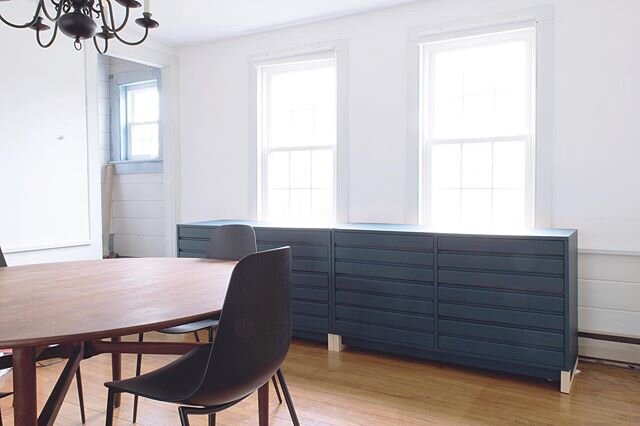
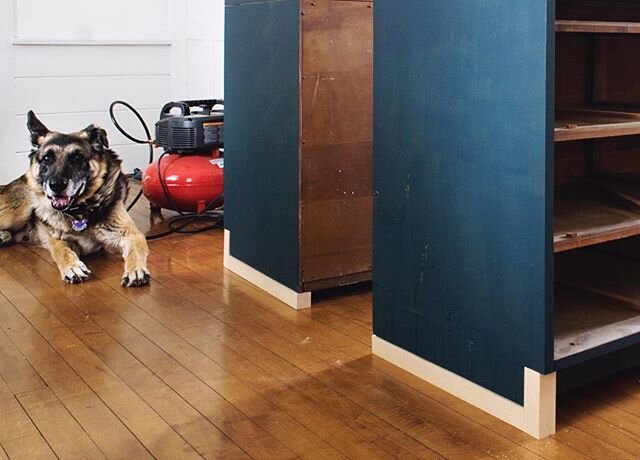
3. Bring in a Signature Color

Its no surprise to our neighbors that we like blues, teals, and greens. The exterior of our house with its bright paint job and almost matching 67' Chevy Bel Air Station Wagon have explained who we are and where we live too many times to count.

"O yeah your the one's with the teal house... your kinda obsessed with that color huh?"

Or " Yes! You have a matching house and car, with like 5 dogs right?"

Haha, yep thats us. Sadly, minus 2 dogs in the last 6 months....

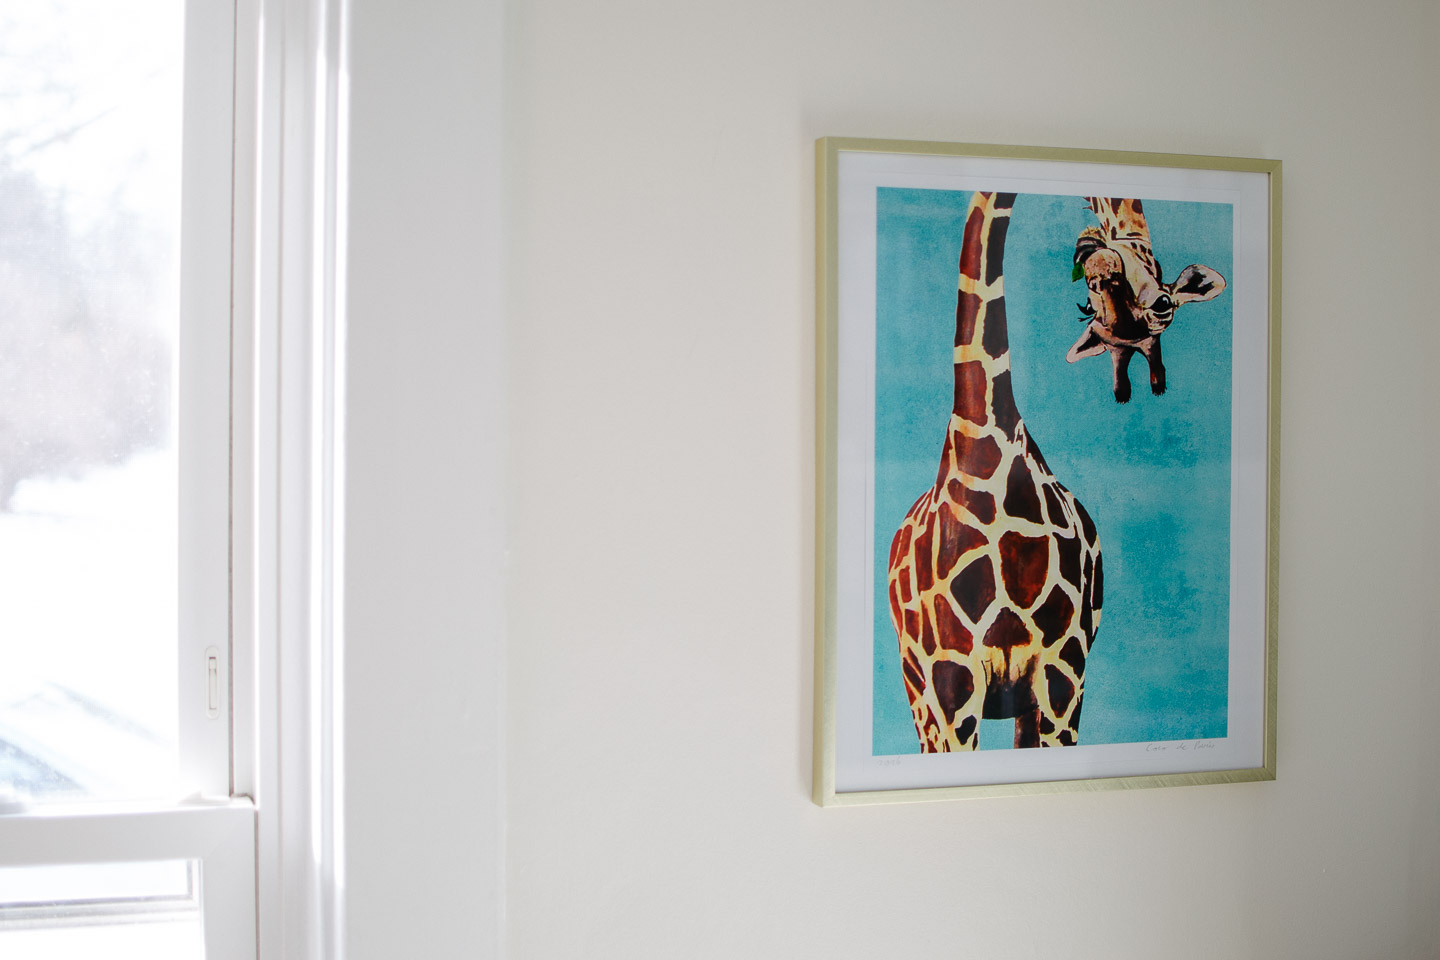
We decided our artwork would need to be a giraffe print somewhere along the line, apropos of who we are as giants. When we saw this teal giraffe print it was a given! What a great way to brighten the space, in our opinion.

4. Putting our money where it counts

When discussing our designs and subsequent purchases we tend to lean towards making sure things are made ethically. By no means are we perfect and only purchase ethically made items, but it is a large factor in whether or not we purchase something.

Putting our money where it counts by sourcing local, small business, USA made, and/or ethically produced products just seems like the right thing to do in our current economy. If that means that we just can't have everything we ever dreamed of, well we have a feeling we will live, and live a more fulfilling life.

In the case of the dining room this meant DIY-ing a light fixture we could afford because the only ones we found were out of our price point. Ordering the print through Etsy.com and re-using so many vintage finds or heirlooms. It makes us feel great to know the history behind our finds.

I originally picked out this bowl on Etsy because it is so gosh darn cute, but then remembered I had hidden this crystal bowl safely away a few years back. The marble is from a local reclaimed building materials yard and is perfect for serving drinks on top of.

I have an obsession with these antique blue jars my sister used for her wedding center pieces (its a good thing she let me steal hoard like all of them after her big day).
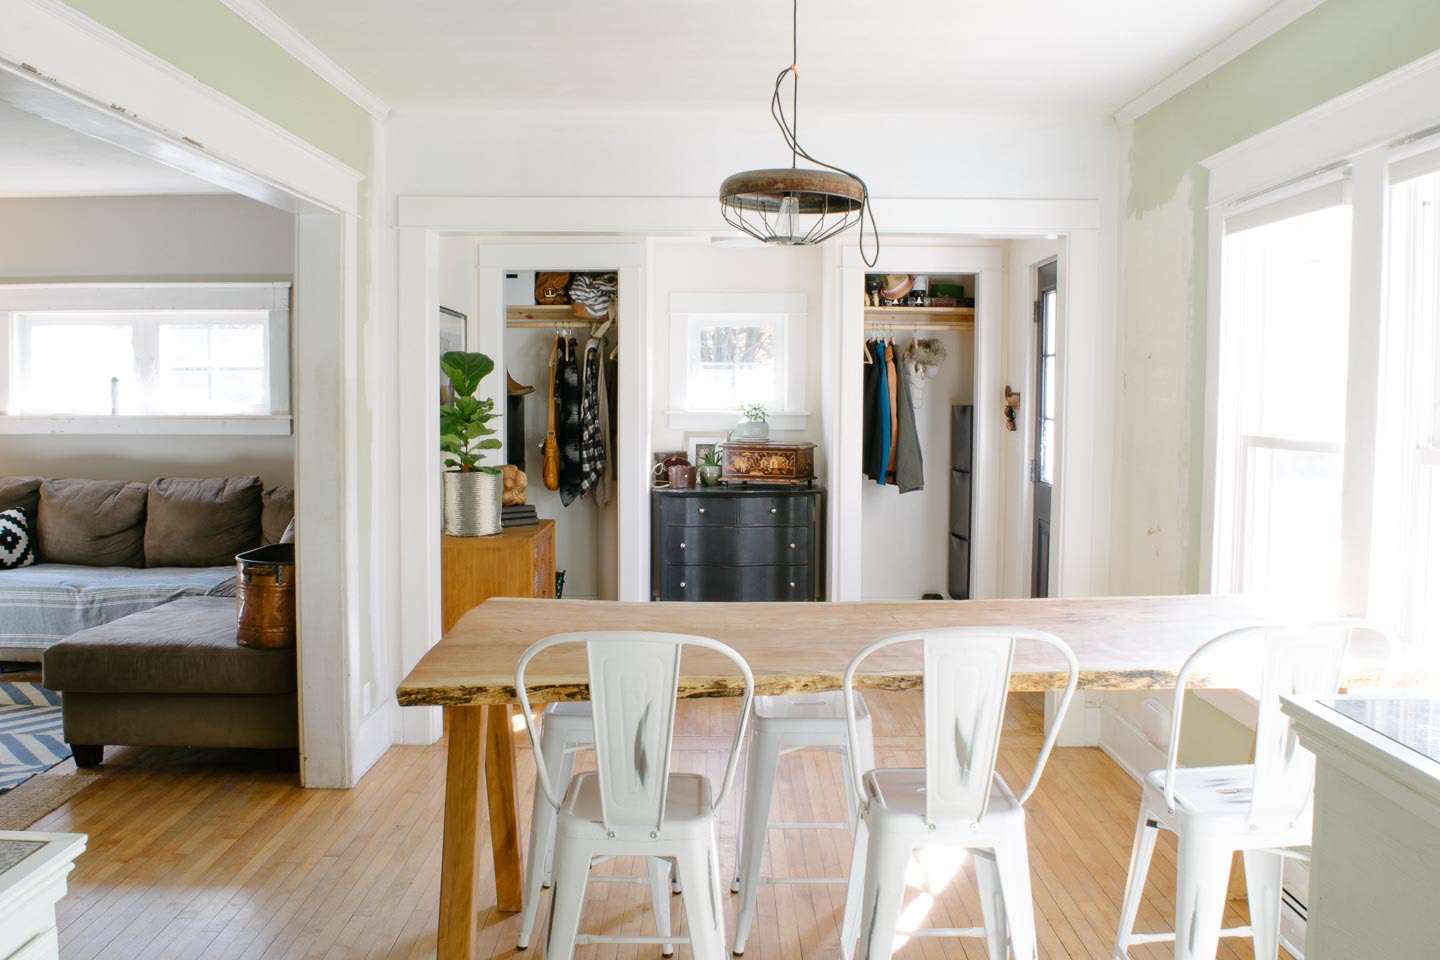
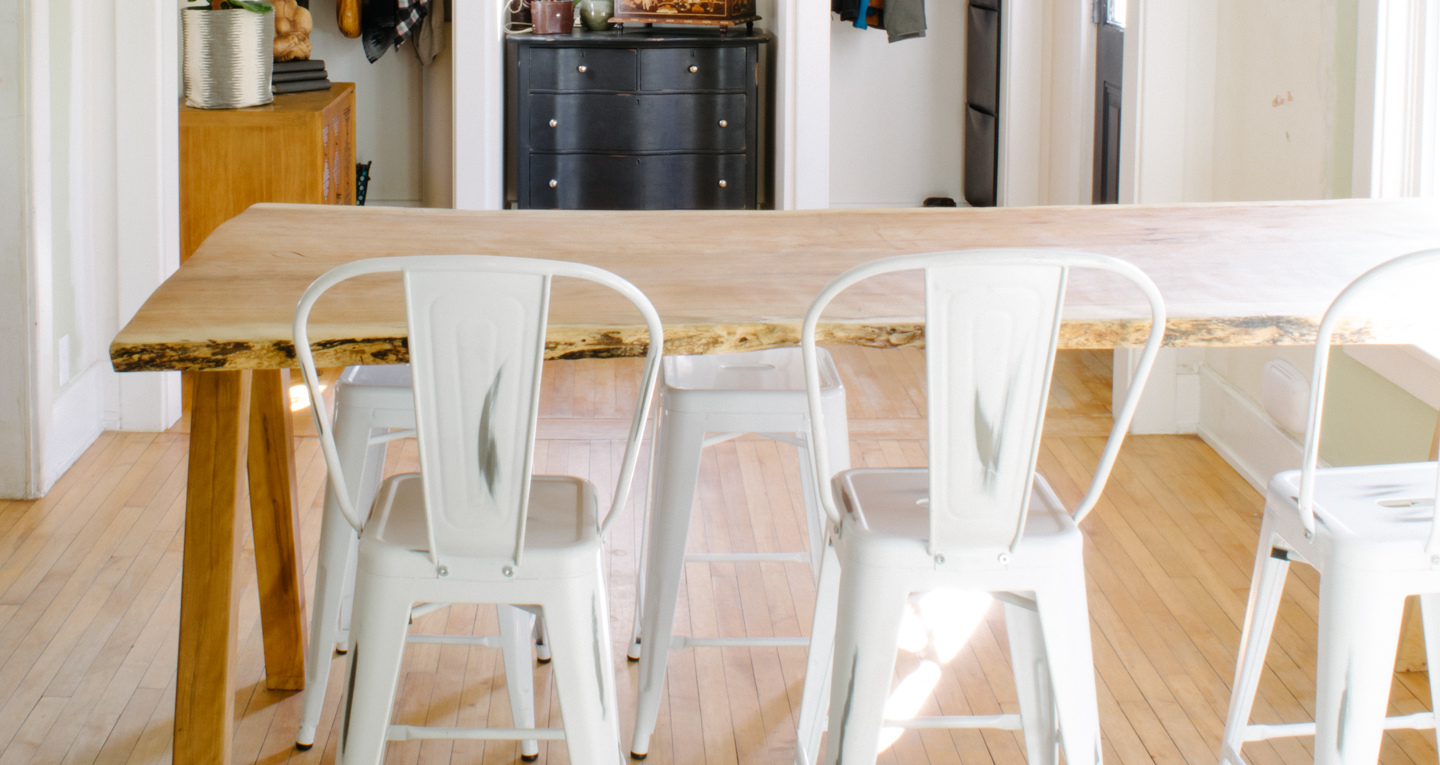
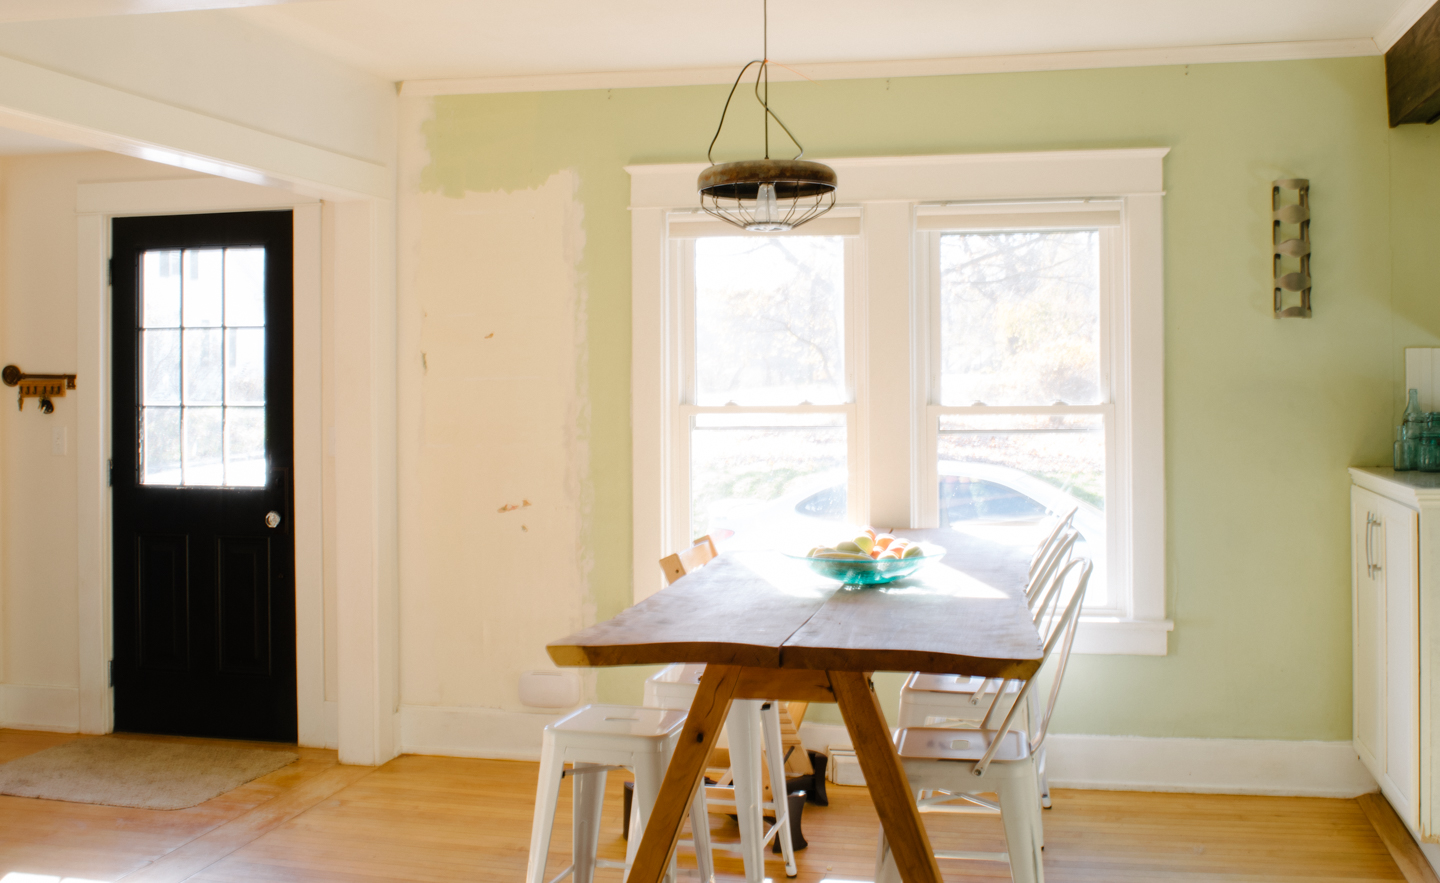
Before & After's

It feels very nice to finally have this room back in order. Of course it will only be a hot second till Mitch, the toddler, or one of the dogs makes a mess of things. Thats just life in a small crazy household.

That white blob on the wall is actually our door bell. When our electrician asked where I wanted it and told me he couldn't get it into the entryway for various reasons. I told him right above the baseboard, he looked at me like I had three heads.

At the end of the day he comes back to me and says "okay it's all finished and I'm never installing another one of those suckers up near the ceiling ever again! It's genius!"

I of course didn't think it was genius at all, just made sense. Why have that ugly thing up high on the wall it doesn't really make it louder?"

Reality Check

The really hard part about having an open concept household is that you can see all the unfinished spaces. So until all the big stuff is done (like closet doors in the entryway), most of the rooms still feel unfinished. Thats why the big push to get a bunch of projects done in 2017, so we can move on with new adventures.

What do you think of the refresh?

Create a sputnik light that will rock your space

This post may contain affiliate links. Read the full disclosure here Follow my blog with Bloglovin


When we found all our inspiration for the dining room it became clear a Sputnik light was a must have for the space.

A Sput-What??? Wasn't that a Russian Satellite? 

Our biggest problem was the budget, although we did find a few great looking lights on Etsy for a pretty decent price, we still couldn't swing it and afford some of the other items to be checked off the list for this room. We've been working so hard to #finishthatspace this year and really didn't want to pour all of the funds into one piece, however wonderful it may be.

So, DIY seemed to be our best avenue, and Mitch has some experience with electrical so we soldiered on.

**Disclaimer** We are not electricians and have no prior experience with lighting design. This post gives you a general outline and parts list for this light fixture; you purchase, assemble, and install at your own risk. If you are running a dimmer switch, ensure that your total wattage does not exceed what the dimmer switch can handle. Nine bulbs x 60 watts per, put us well over the dimmer's rating and we ended up changing it out.

Sputnik Light: Making a Plan

Once I had my inspiration pictures in-hand, I went on a virtual search for parts; where does one actually find brass fixture parts you ask? Having never built or thought of building a fixture like this took a bit to figure out. Alas, I found Grand Brass Lamp Parts and they fit my criteria, USA company located close to us in West Haven, CT.

I even found a couple of designer DIY kits you can purchase through them with all the supplies you need to build your own!

When we started adding up all the pieces needed for the project, it became apparent the cost was going to put us up and over $200 for the lot. Thats when the real designing started, my favorite part.

We couldn't afford everything to be brass, so how do we get a high quality piece with some compromise to reduce the overall cost? We started thinking about what it would look like to do both brass and steel like in our mood board inspiration.

Although we really liked the look, it didn't seem like we could find the right male steel rods for the brass center body. We really liked the mix of metals, and how it added some depth to the fixture without becoming too flashy.

In the end, we figured out a huge part of the cost was going to be the brass socket covers (with 9 of them) and the bare porcelain sockets lent the same depth to the fixture. So it was decided the white porcelain would work well with our cafe stools.

porcelain light sockets

porcelain light sockets

We got the overall aesthetic we were looking for because of the budget constraints we had, now we had our very own light.

Sputnik Light: Ordering your parts

unassembled sputnik light parts

lighting wire

Sputnik Materials List & Pricing


  • TOTAL:       $   183.31


Sputnik Light: Assembling the Light

Putting all of the brass together is fairly straight forward; male threads to female threads. Before you connect anything to the main body, get the porcelain sockets wired and the wires run through the piping. Make sure you get all of the wires connected consistently, and leave yourself about an extra 20" of wire that will extend out of the main body. You can trim back later, but don't leave yourself short.

  • Wire Porcelain Sockets (white wires to silver screws, black wire to gold screws)
  • Run the socket wires through 13" male piping
  • Connect the three small tapered cluster bodies (Picture below)
  • Connect all male pipes, and small tapered cluster bodies to the main body

small cluster body

putting arms on light fixture body

wires wrapped in body

top cap on large cluster body

Once you get to the end, you are going to have two wires for every bulb sticking out of the main body. Keep this in mind while designing and adjust for a bigger body, the more bulbs you have. For us, 18 wires was a lot for this size body. We had not a millimeter to spare.

We had so many wires, we could not group them all together. In the end, we ran four total wires to the box, two black and two white; this way we could split the total number of wires we had to group in half.

  • Connect wires as mentioned above, close top of cluster body
  • Run the four wire's to the ceiling box
  • Hang from the crossbar hanging kit
  • Mount your canopy and optional medallion

Hyper lapse Video's of Assembly

**Disclaimer actions do not happen as quickly as hyper lapse depicts**


Reveal Pictures

finished sputnik light

finished sputnik light

finished sputnik light

Reality Check

You may have noticed the medallion on the ceiling in these picture's, that became a solution to a "problem" that couldn't have been avoided. Our light was never centered, on anything; not the original opening to the living room, not on the room in either direction, and not on the original window, nothing. So when we decided to spend this money (not to mention time and effort) on a grown up light fixture, we knew it would drive us crazy to not have it centered on the window in the dining room.

Of course this conversation didn't come up until we were ready to order all the parts (which were already adding up above the budget) and the solution ideas were seeming very complicated and therefore expensive.

  • If we filled the hole in our ceiling after centering the light fixture you would see the patch job. The current ceiling's have a distinctive swirl finish which looks great and adds a bit of character.
  • Building some type of cover would result in more holes into the ceiling and we really didn't want the plaster falling down on us (talk about a project getting bigger)

So if you can imagine, things got a little tense, Mitch and I sitting across from one another at the dining table. (Yeah we do argue about this stuff just like your average homeowner).

A ceiling medallion would seem an easy solution, but generally speaking they are very ornate, or tend to look like your covering something up. I was really, super unsure about putting more detail in such a small room. But in an effort to #finishthatspace, like we said we would this year, I sucked it up and ordered the simplest medallion I could find. We love it,  especially what it cost us!

I sucked up drywall and blown-in insulation dust to move the damn light over 4". Although, I am glad we noticed this before going through all of the effort of getting the light up on to the ceiling....I HATE doing things over. So, two trips up into the attic, one to assess how the box was affixed, the other to pull the wire through the old hole and into the new. 

light medallion

ceiling medallion

Do you think it needs a coat of trim paint? Mitch seems to think we should leave it as is, I'm worried it looks too plastic...


Want the Sputnik look but not the DIY work? Check these out...

This post may contain affiliate links. Read the full disclosure here.

  1. 9 Socket Mid-Century Brass Sputnik
  2. Large 36" Modern Gold Brass Starburst Chandelier
  3. Industrial chandelier light, 18 lights pendant light
  4. Midcentury Modern, industrial lighting, Sputnik Chandelier


Dining Room Before Photo's & Before the Before's

dining-room-before-post-Featured-Image-Title.jpg

Confused much yet? When I started writing this post I realized we hadn't talked much about how the dining room looked before our porch remodels. Other pictures are located on Our Tiny House Page but I wanted to take you back a step first.

The Before's of the Dining Room Before

We never took any photo's of this space when we moved in but originally it had an original wood sash window looking into the small front porch. (We repurposed the window a frame that holds vintage cigar labels here).

Here you can see that space framed and skim coated:

Dining Room before filled in window

After taking the window out we filled the space in and used pallet board to finish the wall around the original corner cabinet.

Dining room before of pallet wall

Dining room before of pallet wall

Mitch and I really enjoyed the pallet board but when we got the opportunity to turn our small exterior porches into the front entry and office space, we jumped.

Dining Room Before

Yet another wall needed to come down to keep with the open plan we already had with the living and kitchen.

Making the walkthrough's in these rooms similar, really helped with the sting of taking an original piece (the corner cabinet) and all its charm out of the house.  At least we were keeping with the original architecture of the home.

So, ever since that remodel in early 2015 we have had a patched wall where the corner cabinet used to sit.

dining room before

If you watched our 2017 video walkthrough or read about our dining room inspiration, you already know we have to do a lot of much needed patching and painting.

These spots were made by Haverly's jumper which hooked to the trim, I'll take some patching for all the fun she had in that thing any day.

Dining Room Trim needs paint

The old chicken feeder light fixture just doesn't bring enough light into this space and was always a temporary fixture. Of course temporary usually means a couple of years around here. 

full dining room before

The table was our DIY project last year. We made it from wood milled from a dead tree the electric company had to cut off our property. We had another company came in and mill the tree right on our property taking half of the tree as payment for services. It was the coolest process watching this small young guy handle the milling like he was a 300lb lumber jack.

live edge table being made

live edge table being made

live edge table being made

live edge table being made

The table turned out wonderful, my design however, not what I was hoping for. I really didn't want the apron to show too much and therefore had Mitch build it too narrow for the table. It resulted in the top warping over the last year and a half (especially because we used a hanging high chair for little Haverly in that time period).

So right now we are living with it. Next fall we will be figuring out a solution to the problem. Either with salvaging this table in some way or possibly creating a new table out of the wood we still have.

dining room cafe stools

The cafe stools have been a nice height for the table which we made at counter height (due to our Giant size), they will be staying and should play off of the light fixture nicely. I can't wait to show you guys what we've done for the light fixture in this room!

dining room cafe stools

Dining Room Before


Dining Room Before: Reality Check

Getting enough time to complete this room is proving to be difficult. Mitch decided he was going to become a chicken farmer the other day, and we had six chickens and a coop delivered. Although it should be very nice to have fresh eggs, the learning curve is adding to an already booked month.

On a side note, Mitch is already being called Sergeant Chicken in our little farm community! All the locals think it funny to see us trying our hand in farming.

Anyone else jumping into the great unknown this New Year? We would love to hear about your crazy adventures!

Dining room inspiration & design coloring page printables

DiningInspirationFeatureImage.jpg

Like all the rooms in our home, the dining room is still a work in progress. Part of our push in 2017 is to finish our projects we have already started, or need to finish.

So were starting with the dining room in January and finishing a few things that have been lingering since the porch remodels. Things like painting the room, fixing the crown molding, finally installing a light fixture that lights up the table adequately, and putting up some art. Eventually (were thinking next fall) were going to take another stab at our live edge slab table. Which warped on us over the last year.

So its time to start making some product and design decisions. Those can be difficult even for those of us with lots of experience. Heck sometimes I think its even more difficult because I have had so much design experience, I appreciate many styles, textures, and patterns.

When I find it difficult to finalize decisions its usually and indication that I need to slow down, add some constraints or design guidelines, and then look with fresh eyes.

So basically I had to peel my fingers of the pin it button … just walk away from the screen Susie.


What do I mean by guidelines?

First, I go ahead and look at what I have and really think I’m reusing in the current design. Like our live edge table, cafe stools, and mid-century side table.

Then, I take the architecture and homes age into consideration. Since our home has so much character already built in our door casings I don’t want the small rooms to get busy.

So that already narrows down some things and creates some guidelines for the dining room. All the new items will need to work with the items I already have, and our homes bungalow/cottage architecture.

Now, I can narrow down the search. When I come across something I absolutely love (like an idea posted on Pinterest) I can let go of it if it doesn't fit within the guidelines. It makes it easier to find the stuff that will work. Instead of being stuck on too many ideas that won't work and getting overwhelmed.

Once I find inspiration in some photos (possibly with similar items to what I already have), I go ahead and draft a design.

If I’m still having issues with the design and colors,  I will make a coloring page. That way I can really feel free to try some ideas (with no one overseeing).

free printable dining room coloring pages

I’ll even create a couple of designs that have different styles (something a little more traditonal , mid century modern, boho, etc).

Free Printable Coloring Pages

free printable dining room coloring pages

So that leads me to your free coloring pages. You have a couple of different design layouts and styles to choose from and can play with the colors till your hearts content.

How can interior design coloring pages really help?

  • Help you color in your current guidelines (like our floor color and the white cafe stools we already own.)
  • Start to answer those tough questions for yourself. Like do I have too many metals mixed into this room? (It helped me to color in our brass fixture above the dining table since we don't currently have a brass fixture in our house.)
  • Try new styles (you know spread your wings and fly....) If your space is very traditional, how would it look to mix in some mid-century modern pieces? Its easy to take the risk on a coloring page you can just throw out if you hate.
  • Try risky colors. Their is something about coloring it all in yourself that helps you finally make that decision. (Like if green walls will work for you. O yeah that's what I started with when we moved in.)

Doesn't it just feel great to make some of those decisions on your own (or as a couple)? You can end up receiving so much advice about designing your space (friends, family, design shows, co-workers) that your really not sure. Going through a process yourself helps calm the nerves and puts you back in the driver's seat.


free printable dining room coloring pages


You can download the three different designs below and try it out yourself. Go ahead and color your pages in. Don't forget to tag us in your posts so we can see what beauties you come up with!


dining room coloring pages download

Let us know if these pages were helpful and what styles and rooms you might want to see next in the comments. I'd love to create some more for other spaces and styles you might be looking for.


free printable dining room coloring pages

Finding Dining Room Inspiration

With my guidelines in tow I find it easier to love something, and then let it go, and not get my mind jumbled with too many ideas. You shouldn't just follow every rule in design blindly, but guidelines  can help you let go of too many ideas. Which will help zeroing in on the ideas that will work.

So I ended up pulling some inspiration off of Houzz.com, and if you haven't ever check it out, your missing out.

San Francisco Charmer
Resident Art
Those fixtures just make me want to sing! We wanted to add a bit more of the mid-century modern to the room. Which will tie in nicely to our side table which will move into the dining room.
 dining room side table
The only reason I ever got this piece was because my mother hated having it in her room as a child. Apparently it pinched her when closing the doors one too many times. Of course she's over here at our house tons, must drive her crazy to still be plagued by it!

Mood board


  1. We love this amazing giraffe print. It would be a nice reminder to embrace our tall goofy selves.
  2. I don't want the dining to end up too Mid-Century modern with the addition of a fixture like this, but I just keep going back to it. Here's a budget friendlier version.
  3. We painted the entry this Sherwin Williams color and have loved it, most likely you will eventually see it on the kitchen walls as well.
  4. The side cabinet will store our barware, what better then to have a vintage mid century decanter on top like this one. Or this one.
  5. I mean who can resist? Maybe a cactus inside, or maybe a bowl to hold our wine stoppers, and other miscellany.

Once I put together this mood board I realized our colors are very muted. Although my inspirations had white and grey walls, they brought a generous amount of color in with the art and plant life.

I've been playing with my dining room coloring page to see if I'll keep it all muted like below or add color with a giraffe print and plants. The color really looks great in these spaces, maybe I'll embrace the eclectic side and get some more color in everything.

Reality Check

Nothing is ever exactly how you originally envisioned it, the beauty of design is in the process to which you get to the end result (does a room ever really stop evolving?). When I first started designing our dining room table I had decided I wanted to find all different vintage styles of barstools, but it just never lined up where I could find the right height (our table is counterheight) and in reasonable condition to be rehabbed. So we ended up purchasing some and I'm very glad we did, but they still aren't my absolute favorite....

dining room cafe stools

They blend in to the small dining room with a little style, they are so much easier to clean than I would image something we painted would be, and they all came in time for Christmas and guests the year we bought them.

The point is, you don't have to love every single thing in your home to have a wonderfully designed space. Stay tuned in January for how this room comes together, here on the blog, and on Instagram!

Anyone else finally finishing some spaces in the new year?